您现在的位置是:主页 > news > 网站开发+进度表/百度一下网页版搜索引擎
网站开发+进度表/百度一下网页版搜索引擎
![]() admin2025/6/25 0:08:28【news】
admin2025/6/25 0:08:28【news】
简介网站开发+进度表,百度一下网页版搜索引擎,选择大连网站建设,黄骅港在哪里一、过滤器过滤器,就是vue允许开发者自定义的文本格式化函数,可以使用在两个地方:输出内容和操作数据中。定义过滤器的方式有两种。1-1、全局过滤器<body> <div id"d1"><p>{{num}}</p><p>{{num|a}}&…
一、过滤器
过滤器,就是vue允许开发者自定义的文本格式化函数,可以使用在两个地方:输出内容和操作数据中。
定义过滤器的方式有两种。
1-1、全局过滤器
<body>
<div id="d1"><p>{{num}}</p><p>{{num|a}}</p>
</div>
<script >Vue.filter('a',function (num01) {return num01.toFixed(2)})var vm=new Vue({el:"#d1",data:{num:6.66231},methods:{}})
</script>注意一般全局过滤器写一个单独的js文件,导入即可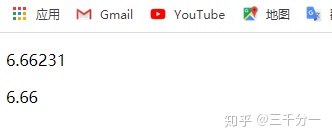
1-2、局部过滤器
<div id="d1"><p>{{num}}</p><p>{{num|a}}</p>
</div>
<script >var vm=new Vue({el:"#d1",data:{num:6.66231},methods:{},filters:{a(num01){return num01.toFixed(2)}}})
</script></body>
二、计算属性
我们之前学习过字符串反转,如果直接把反转的代码写在元素中,则会使得其他同事在开发时时不易发现数据被调整了,所以vue提供了一个计算属性(computed),可以让我们把调整data数据的代码存在在该属性中。
<body>
<div id="d1"><input type="text" v-model="num1">+<input type="text" v-model="num2">=<span>{{total}}</span>
</div>
<script >var vm=new Vue({el:"#d1",data:{num1:0,num2:0},methods:{},computed:{total(){return this.num1+this.num2}}})
</script></body>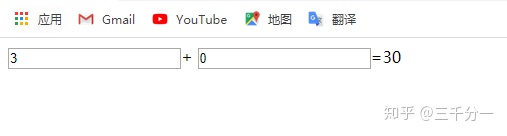
但是这种是字符串拼接,不是计算:
修正:
computed:{total(){return parseFloat(this.num1)+parseFloat(this.num2)}}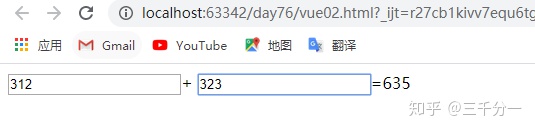
三、监听属性
侦听属性,可以帮助我们侦听data某个数据的变化,从而做相应的自定义操作。
侦听属性是一个对象,它的键是要监听的对象或者变量,值一般是函数,当侦听的data数据发生变化时,会自定执行的对应函数,这个函数在被调用时,vue会传入两个形参,第一个是变化前的数据值,第二个是变化后的数据值。
无限点赞:
<div id="d1">
<button @click="num++">赞{{num}}</button>
</div>
<script >var vm=new Vue({el:"#d1",data:{num:0,},methods:{},watch:{num(){console.log(this.num)}}})
</script>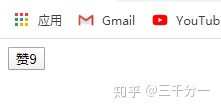
设置点赞次数:加条判断语句即可
watch:{num(){if(this.num>=5){this.num=5}console.log(this.num)}}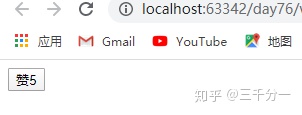
四、vue对象的生命周期
每个Vue对象在创建时都要经过一系列的初始化过程。在这个过程中Vue.js会自动运行一些叫做生命周期的的钩子函数,我们可以使用这些函数,在对象创建的不同阶段加上我们需要的代码,实现特定的功能。
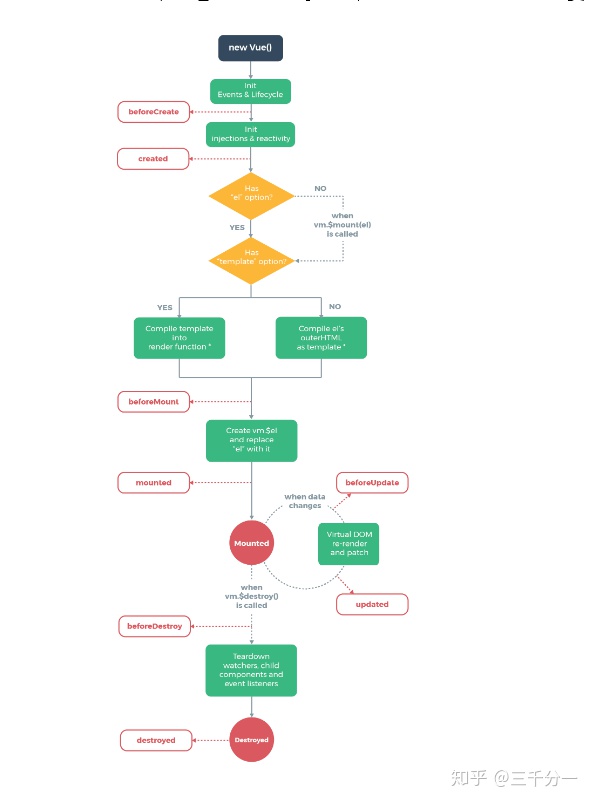
var vm=new Vue({el:"#d1",data:{num:0,},初始化对象之前beforeCreate(){ console.log("beforeCreate,vm对象尚未创建,num="+ this.num); //undefinedthis.name=10; // 此时没有this对象呢,所以设置的name无效,被在创建对象的时候被覆盖为0},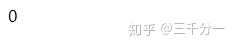
最常用:主要实现到服务端获取页面数据(主要用于写ajax代码)
created(){console.log("created,vm对象创建完成,设置好了要控制的元素范围,num="+this.num );  // 0this.num = 20;},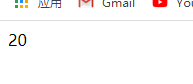
数据渲染到html界面之前
beforeMount(){console.log( this.$el.innerHTML ); // <p>{{num}}</p>console.log("beforeMount,vm对象尚未把data数据显示到页面中,num="+this.num ); // 20this.num = 30;},
最常用:修改页面的内容、特效
mounted(){console.log( this.$el.innerHTML ); // <p>30</p>console.log("mounted,vm对象已经把data数据显示到页面中,num="+this.num); // 30},

这两个用的少:beforeUpdate(){ 修改数据前的操作// this.$el 就是我们上面的el属性了,$el表示当前vue.js所控制的元素#appconsole.log( this.$el.innerHTML ); // <p>30</p>console.log("beforeUpdate,vm对象尚未把更新后的data数据显示到页面中,num="+this.num); // beforeUpdate----31},updated(){ 修改数据后操作console.log( this.$el.innerHTML ); console.log("updated,vm对象已经把过呢更新后的data数据显示到页面中,num=" + this.num ); // updated----31},
五、阻止事件冒泡和刷新页面
事件冒泡:指代js中子元素的事件触发以后,会导致父级元素的同类事件一并被触发到。
事件冒泡有好处,也有坏处。
好处:如果能正确利用这种现象,可以实现事件委托,提升特效的性能
坏处:如果没有正确使用,则会导致不必要的bug出现。
使用.stop和.prevent
事件冒泡:
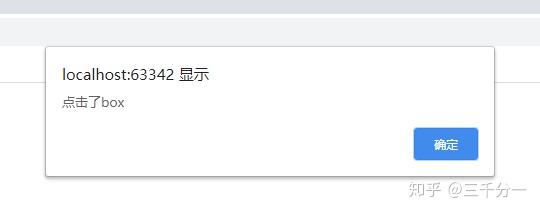
<style>.box1{width: 400px;height: 400px;height: 400px;background-color: red;}.box2{width: 200px;height: 200px;background-color: green;margin: auto;margin-top: 50px;}</style><body onclick="alert('点击了box')">
<div class="box1"><div class="box2"></div>
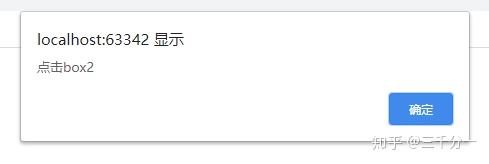
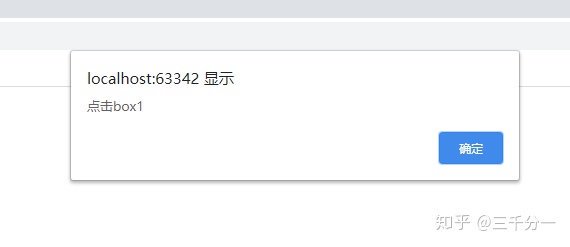
</div><script>var box1=document.getElementsByClassName('box1')[0]var box2=document.getElementsByClassName('box2')[0]box1.onclick=function () {alert('点击box1')}box2.onclick=function () {alert('点击box2')}</script>
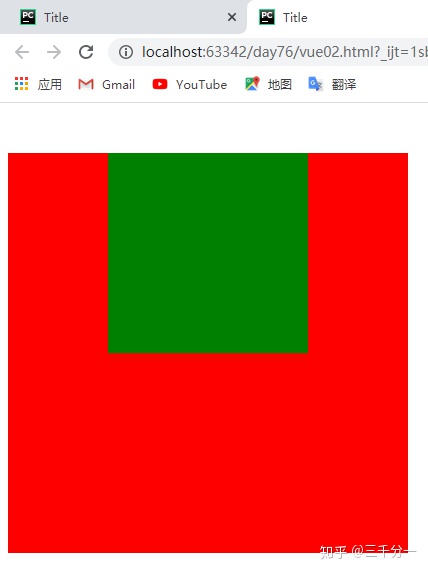
点击发生事件:
阻止事件冒泡(js中):
box2.onclick=function (event) {alert('点击box2');console.log(event)event.stopPropagation()}事件委托:触发元素的事件绑定给父元素
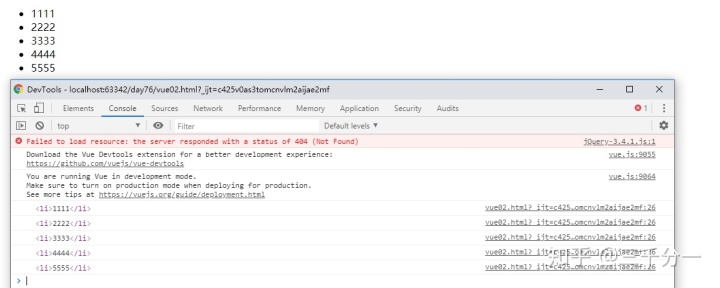
<ul id="d1"><li>1111</li><li>2222</li><li>3333</li><li>4444</li><li>5555</li>
</ul><script>var ul=document.getElementById('d1')ul.onclick=function (event) {console.log(event.target)}</script>
阻止事件冒泡(vue)
加 .stop 即可<body><div id="app" class="box1" @click="show('点击了box1')"><div class="box2" @click.stop="show('点击了box2')"></div></div><script>var vm = new Vue({el:"#app",methods:{show(message){alert(message);}}})</script>阻止页面刷新:
加 .prevent 即可<div id="d1"><a href="https://translate.google.com/" @click.prevent="show">地图</a>
</div><script>var vm = new Vue({el:"d1",methods:{show(){}}})</script>
</body>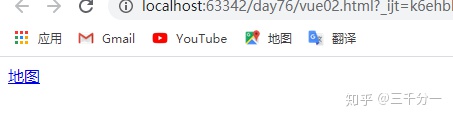
六、综合案例-todolist
计划列表:
1、显示数据:
<body><div class="list_con" id="d1"><h2>To do list</h2><input type="text" name="" id="txt1" class="inputtxt"><input type="button" name="" value="增加" id="btn1" class="inputbtn"><ul id="list" class="list"><!-- javascript:; # 阻止a标签跳转 --><li v-for="item in total_list"><span>学习html</span><a href="javascript:;" class="up"> ↑ </a><a href="javascript:;" class="down"> ↓ </a><a href="javascript:;" class="del">删除</a></li></ul></div><script>var vm=new Vue({el:"#d1",步骤1、    data:{total_list:['学习html','学习css','学习javascript']},})</script>
</body>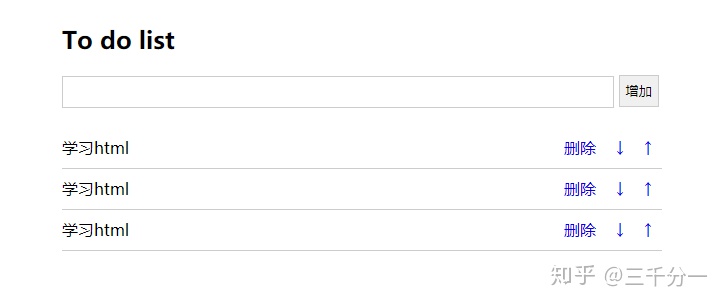
2、添加、删除数据:
添加:
<body><div class="list_con" id="d1"><h2>To do list</h2>步骤1、	<input type="text" v-model="content" id="txt1" class="inputtxt">步骤2、	<input type="button" @click="add" value="增加" id="btn1" class="inputbtn"><ul id="list" class="list"><!-- javascript:; # 阻止a标签跳转 --><li v-for="item in total_list"><span>学习html</span><a href="javascript:;" class="up"> ↑ </a><a href="javascript:;" class="down"> ↓ </a><a href="javascript:;" class="del">删除</a></li></ul></div><script>var vm=new Vue({el:"#d1",data:{content:'',total_list:['学习html','学习css','学习javascript'],},methods:{步骤3、       add(){this.total_list.push(this.content);this.content=''}}})</script>
删除:
<body>
<div class="list_con" id="d1"><h2>To do list</h2><input type="text" v-model="content" id="txt1" class="inputtxt"><input type="button" @click="add" value="增加" id="btn1" class="inputbtn"><ul id="list" class="list"><!-- javascript:; # 阻止a标签跳转 --><li v-for="item in total_list"><span>学习html</span><a href="javascript:;" class="up"> ↑ </a><a href="javascript:;" class="down"> ↓ </a>步骤1、	        <a href="javascript:;" class="del" @click="del(index)">删除</a></li></ul></div><script>var vm=new Vue({el:"#d1",data:{content:'',total_list:['学习html','学习css','学习javascript'],},methods:{add(){this.total_list.push(this.content);this.content='';},步骤2、  del(index){this.total_list.splice(index,1)}}})</script>
3、移动数据:
<a href="javascript:;" class="up" @click="up(index)"> ↑ </a>
<a href="javascript:;" class="down" @click="down(index)"> ↓ </a>up(index){			let current = this.todolist.splice(index,1)[0];this.todolist.splice(index-1, 0, current);},down(index){let current = this.todolist.splice(index,1)[0];this.todolist.splice(index+1,0,current);}


