提要
需求:载入一张图片并显示,能够放大缩小,能够截取图片的某个矩形并保存。
原以为蛮简单的一个功能,事实上还是有点小复杂。
最简单Qt图片浏览器能够參考Qt自带的Demo:Image Viewer Example
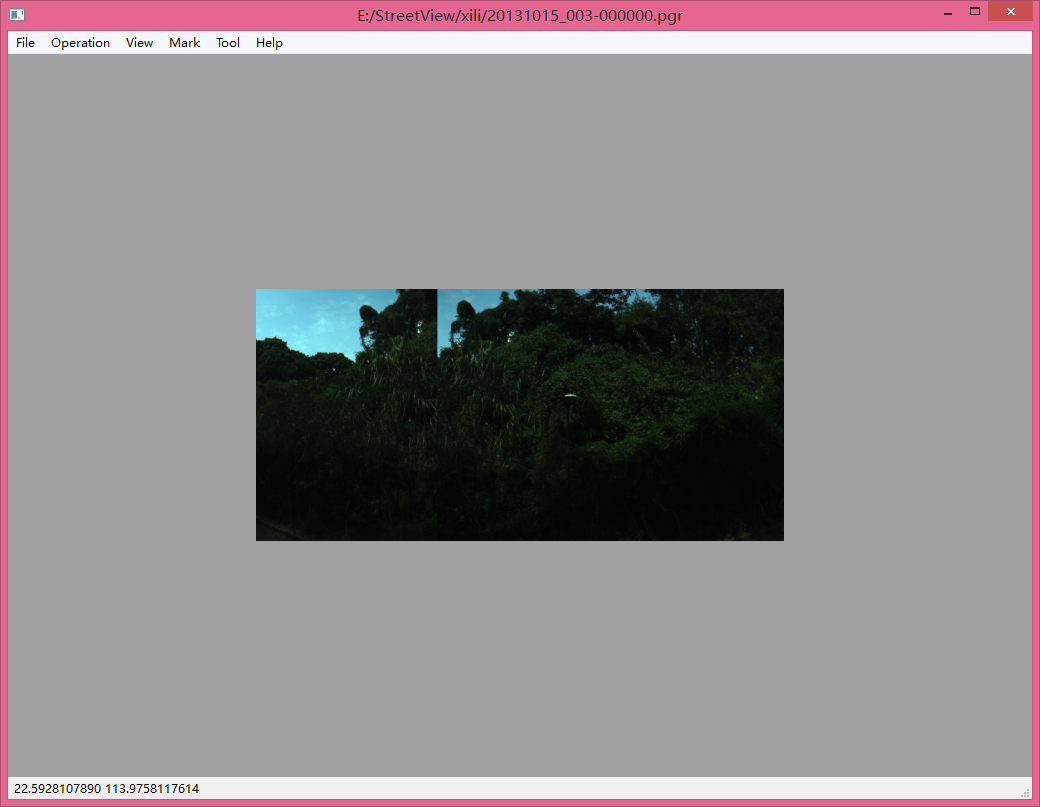
看一下终于的实现效果:
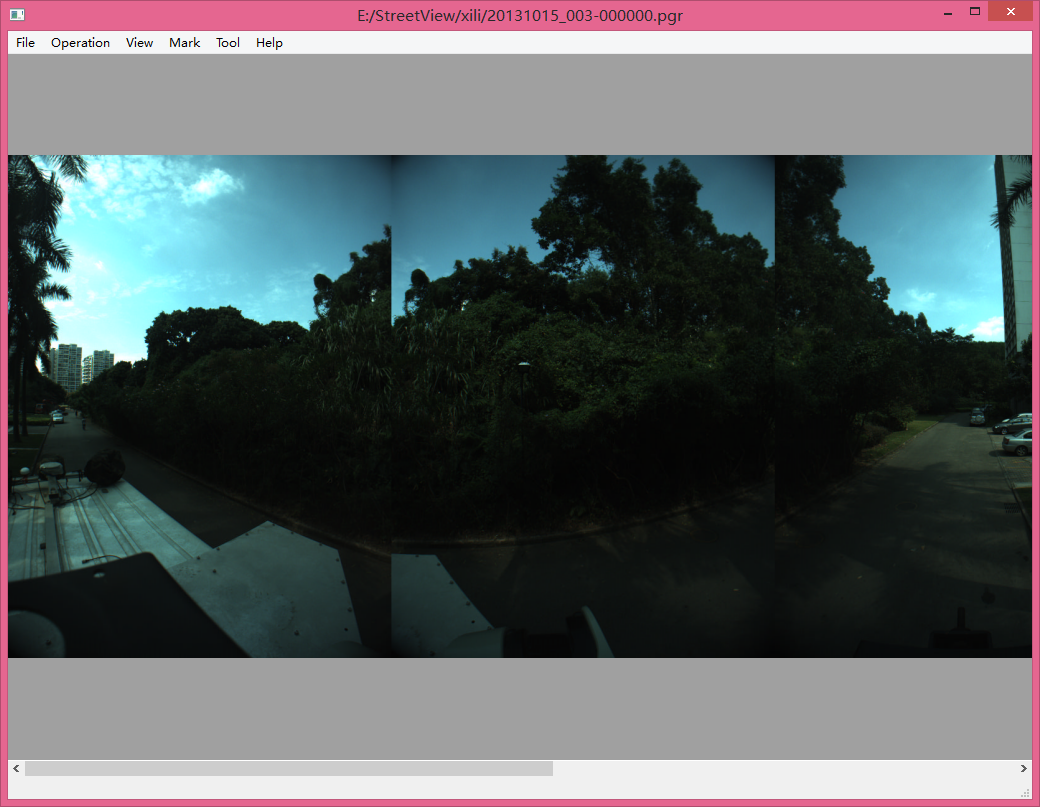

图片的载入显示
这里须要实现一个QImageViewer的类。继承自QWidget。
图片用QPixmap来载入和显示,还有三个成员各自是图片的缩放因子,图片是否已经载入,viewer是否已经初始化,是否处于裁剪状态。
private:
QPixmap m_pixmap;
float scalling;
bool isLoaded;
bool isIntialised;
bool isCropping;
scalling值是用于记录图片的缩放比例。
显示图片仅仅要又一次定义paintEvent,在里面绘制m_pixmap就能够了。
void QImageViewer::paintEvent(QPaintEvent *event)
{QWidget::paintEvent(event);if (m_pixmap.isNull()){return;}QPainter painter(this);if (isLoaded){painter.setRenderHint(QPainter::SmoothPixmapTransform);QSize pixSize = m_pixmap.size();//For canvas's size not change when window's size change.if (!isInitialised){QSize initialSize = event->rect().size();scaling = 1.0 * initialSize.width() / pixSize.width();isInitialised = true;}pixSize.scale(scaling * pixSize, Qt::KeepAspectRatio);this->setMinimumSize(pixSize);QPoint topleft;topleft.setX((this->width() - pixSize.width()) / 2);topleft.setY((this->height() - pixSize.height()) / 2);painter.drawPixmap(topleft, m_pixmap.scaled(pixSize, Qt::KeepAspectRatio, Qt::SmoothTransformation));}
}
截图
思路非常easy。首先选择进入裁剪模式(能够在menu中加入一个action或者用快捷键),然后在图片上拖出一个矩形。最后按回车。截取完毕,Ctrl + s 保存。
主要用到的是 QPixmap::copy(QRect rect) 方法。
首先要实现一个CropRect类,用于记录截取的矩形。
#ifndef CROPRECT_H
#define CROPRECT_H
#include <QPoint>
#include <QPainter>class CropRect
{
public:CropRect(){}~CropRect(){}void setStart(QPoint s) { start = s; } void setEnd(QPoint e) { end = e; } QPoint startPoint() const{ return start; } QPoint endPoint() const{ return end; } void reset(){QPoint P(0,0);start = P;end = P;}QSize& size() const{return QSize(width(), height());}int height() const{return qAbs(startPoint().y() - endPoint().y());}int width() const{return qAbs(startPoint().x() - endPoint().x());}private:QPoint start;QPoint end;
};#endif // CROPRECT_H
注意这里的start和end都是相对于当前要截取的图片的位置。也就是图片的左上角的坐标是CropRect的原点。
接下来再QImageviewer中实现两个辅助的方法。
由于图片并非恰好全然充满窗口,所以在设定裁剪框的时候,鼠标假设没有点在图片上,就应该不裁剪。所以首先应该推断屏幕中的某个点是否在图片上。
bool QImageViewer::isContainPoint(QPoint &p)
{QSize s = m_pixmap.size();s.scale(scaling * s, Qt::KeepAspectRatio);//If pixmap bigger than current window.if ((s.height() > this->rect().height()) && (s.width() > this->rect().width())){return true;}QPoint topleft;topleft.setX((this->width() - s.width()) / 2);topleft.setY((this->height() - s.height()) / 2);QRect rect(topleft, s);return rect.contains(p);
}
第二个方法就是将鼠标的位置映射到图片上的位置,由于截图主要是对图片进行操作。
图片的大小和窗口大小有四种情况,第一种是图片高度和宽度都大于窗口。
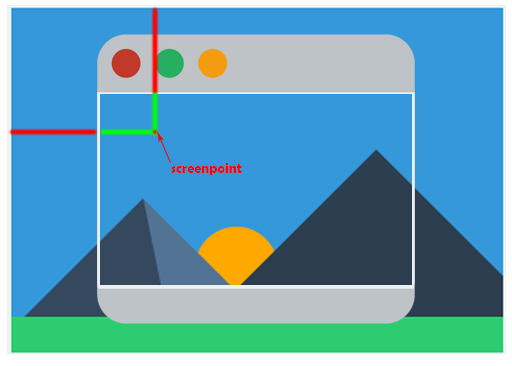
逻辑就是将红色和绿色部分相加,得到点对于当前图片(已缩放)的位置。最后除以scalling就能够了。
另一种是图片全然在窗口里面
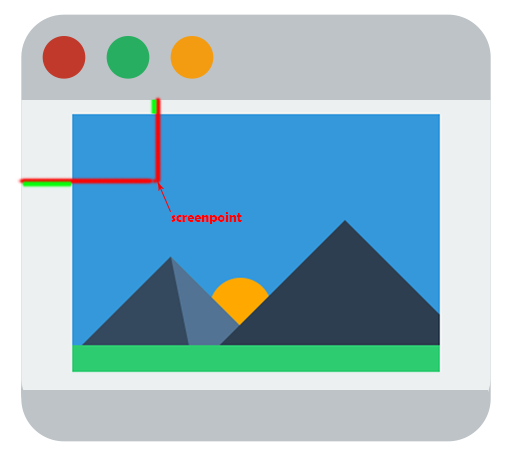
这样的情况将红色减去绿色部分,得到点对于当前图片(已缩放)的位置。最后除以scalling就能够了。还有两种简单的情况就不展开了,详细代码例如以下:
QPoint QImageViewer::mapToPixmap(QPoint &screenPoint)
{QSize pixmapSize = m_pixmap.size();pixmapSize.scale(scaling * pixmapSize, Qt::KeepAspectRatio);//Get the position of screenPoint to the pixmap in show. QPoint tmpPos;if (pixmapSize.width() > this->width() && pixmapSize.height() > this->height()){tmpPos.setX(pixmapSize.width() - (this->width() - screenPoint.x()));tmpPos.setY(pixmapSize.height() - (this->height() - screenPoint.y()));}else if (pixmapSize.width() < this->width() && pixmapSize.height() > this->height()){tmpPos.setX(screenPoint.x() - (this->width() - pixmapSize.width()) / 2);tmpPos.setY(pixmapSize.height() - (this->height() - screenPoint.y()));}else if (pixmapSize.width() > this->width() && pixmapSize.height() < this->height()){tmpPos.setX(pixmapSize.width() - (this->width() - screenPoint.x()));tmpPos.setY(screenPoint.y() - (this->height() - pixmapSize.height()) / 2);}else{QPoint topleft;topleft.setX((this->width() - pixmapSize.width()) / 2);topleft.setY((this->height() - pixmapSize.height()) / 2);tmpPos.setX(screenPoint.x() - topleft.x());tmpPos.setY(screenPoint.y() - topleft.y());}//return the position to the real pixmap.*/return QPoint(tmpPos.x() / scaling, tmpPos.y() / scaling);
}
这里採取了一个投机取巧的办法。就是利用了QPoint.setX() 和 QPoint.setY()方法假设传进去的是负值,那么就等于传进去0,所以少了一些小于0的推断。
接下来就是相应的鼠标事件,用于确定裁剪框的大小
void QImageViewer::mousePressEvent(QMouseEvent *event)
{if ((event->buttons() == Qt::LeftButton) && isContainPoint(event->pos()) && isCropping){cropRect.setStart(mapToPixmap(event->pos()));cropRect.setEnd(mapToPixmap(event->pos()));isStartingCrop = true;}
}void QImageViewer::mouseMoveEvent(QMouseEvent *event)
{if ((event->buttons() == Qt::LeftButton) && isStartingCrop){if (isContainPoint(event->pos())){cropRect.setEnd(mapToPixmap(event->pos()));update();}}
}void QImageViewer::mouseReleaseEvent(QMouseEvent *e)
{QRect rect(cropRect.startPoint(), cropRect.endPoint());isStartingCrop = false;
}
裁剪框绘制的相关代码。这里也依据startpoint 和endpoint的相对位置,也有几种情况须要注意一下。
更炫酷的动态蚂蚁线能够參考:Qt中绘制蚂蚁线
if (isCropping){qDebug() << cropRect.width() << cropRect.height();//painter.setPen(Qt::darkGreen);QPen pen;pen.setBrush(Qt::red);pen.setStyle(Qt::DashLine);pen.setWidth(1);painter.setPen(pen);//start point in the left to the end point.if (cropRect.startPoint().x() < cropRect.endPoint().x()){if (cropRect.startPoint().y() < cropRect.endPoint().y()){//start point in the top to the end point.painter.drawRect(topleft.x() + cropRect.startPoint().x() * scaling, topleft.y() + cropRect.startPoint().y() * scaling, cropRect.width() * scaling, cropRect.height() * scaling);}else{//start point in the bottom to the end point.painter.drawRect(topleft.x() + cropRect.startPoint().x() * scaling, topleft.y() + cropRect.endPoint().y() * scaling, cropRect.width() * scaling, cropRect.height() * scaling);}}else{if (cropRect.startPoint().y() > cropRect.endPoint().y()){painter.drawRect(topleft.x() + cropRect.endPoint().x() * scaling, topleft.y() + cropRect.endPoint().y() * scaling, cropRect.width() * scaling, cropRect.height() * scaling);}else{painter.drawRect(topleft.x() + cropRect.endPoint().x() * scaling, topleft.y() + cropRect.startPoint().y() * scaling, cropRect.width() * scaling, cropRect.height() * scaling);}}}最后就是裁剪了
void QImageViewer::cropFinished()
{QRect crop(cropRect.startPoint(), QSize(cropRect.width(), cropRect.height()));QPixmap cropped = m_pixmap.copy(crop);m_pixmap = cropped;cropRect.reset();isCropping = false;this->update();
}
打完收工。


