您现在的位置是:主页 > news > 做设计什么网站兼职/免费建立自己的网站
做设计什么网站兼职/免费建立自己的网站
![]() admin2025/6/15 10:42:14【news】
admin2025/6/15 10:42:14【news】
简介做设计什么网站兼职,免费建立自己的网站,邢台做wap网站找谁,Mac日历发布到wordpress平时开发的时候我们总会碰到这样的需求。 image.png有时是多选,有时是单选,这样的页面基本都是用RecyclerView来做的,而如果每次做操作的时候都要去写这个单选框/多选框的逻辑,那就太麻烦了,所以我就想把这样的单选/多…
平时开发的时候我们总会碰到这样的需求。
有时是多选,有时是单选,这样的页面基本都是用RecyclerView来做的,而如果每次做操作的时候都要去写这个单选框/多选框的逻辑,那就太麻烦了,所以我就想把这样的单选/多选列表功能给封装起来。
一.思路
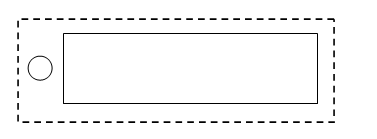
这种功能的基本布局页面都是这样
或者有些需要把选择框放在右边
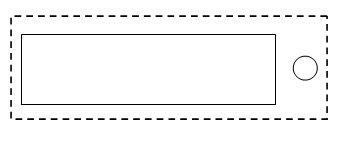
我的思路是外层还是用RecyclerView来做,里层(就是实线内)我打算用ViewModel来做,这样既能封装外层的选择框逻辑,对内层也低耦合。
二.效果展示
1.单选模式

2.多选模式

PS:左边的布局是个ViewModel可以自由定义,因为时间的问题我没时间再写另外的布局来展示。
三.调用方法
调用方法很简单:
1.定义自己的ViewModel
2.调用
 checkRecyclerView = new CheckRecyclerView.Builder<ChoseShopEntity>(this,"com.berchina.o2omerchant.ui.viewModel.shop.ChoseShopViewModel").setItemDecoration(new XXXItemDecoration(10)).setBackgroupColorResID(R.color.divider_grey)
//                .setCheckboxResID(R.drawable.cb_shop_create).setIsRadio(false).builder();framelayout.addView(checkRecyclerView.getContentView());
Builder中的第二个参数我传的就是ViewModel的类名。
3.设置数据
checkRecyclerView.setAdapter(datalist);
封装好了用起来就是快,不会每次都要重复去写单选和复选的逻辑。
四.CheckRecyclerView内的操作
我这里把RecyclerView、Adapter和ViewHolder都写在一个类中,仿照RecyclerView源码的写法,当然分开写也行。
先贴全部代码吧
public class CheckRecyclerView<T extends CheckRecyclerView.CheckRecyclerEntity> {protected Context context;protected RecyclerView recyclerView;protected static CheckRecyclerAdapter adapter;// 0 表示都不显示,1表示显示左边,2表示显示右边protected static int isShow;protected static String vmName;protected static int checkboxResID;protected static boolean isRadio;protected static RadioObserver radioObserver; // 监听单选protected static MultiObserver multiObserver; // 监听多选protected Builder builder;// 单选情况下的观察者private static Action1<Integer> observer1 = new Action1<Integer>() {@Overridepublic void call(Integer integer) {if (adapter != null){adapter.checkChange(integer);}}};// 多选情况下的观察者private static Action1<Integer> observer2 = new Action1<Integer>() {@Overridepublic void call(Integer integer) {if (adapter != null){adapter.multiChose(integer);}}};private CheckRecyclerView(Context context,Builder builder){this.context = context;this.builder = builder;this.isShow = builder.isShow;this.vmName = builder.vmName;this.checkboxResID = builder.checkboxResID;this.isRadio = builder.isRadio;this.radioObserver = builder.radioObserver;this.multiObserver = builder.multiObserver;initView();}private void initView(){recyclerView = new RecyclerView(context);recyclerView.setLayoutParams(new ViewGroup.LayoutParams(ViewGroup.LayoutParams.MATCH_PARENT, ViewGroup.LayoutParams.MATCH_PARENT));recyclerView.setBackgroundResource(builder.backgroupColorResID);recyclerView.setLayoutManager(builder.layoutManager);if (builder.itemDecoration != null) {recyclerView.addItemDecoration(builder.itemDecoration);}}/*** 设置适配器*/public void setAdapter(){List<T> datalist = builder.datalist;if (datalist == null){datalist = new ArrayList<T>();}adapter = new CheckRecyclerAdapter(context,datalist);recyclerView.setAdapter(adapter);}/*** 设置适配器*/public void setAdapter(List<T> datalist){adapter = new CheckRecyclerAdapter(context,datalist);recyclerView.setAdapter(adapter);}/*** get and set 方法*/public RecyclerView getContentView() {return recyclerView;}public static CheckRecyclerAdapter getAdapter() {return adapter;}public void setIsShow(int isShow) {this.isShow = isShow;}public static void setVmName(String vmName) {CheckRecyclerView.vmName = vmName;}/*** 获取到选择的结果* 规则:-1表示没有选择*/// 单选左public int getLeftRadio(){if (adapter != null && adapter.getDatas() != null && adapter.getDatas().size() > 0){return adapter.getLeftRadio();}return -1;}// 单选右public int getRightRadio(){if (adapter != null && adapter.getDatas() != null && adapter.getDatas().size() > 0){return adapter.getRightRadio();}return -1;}// 多选左 返回被选中的数组public List<Integer> getLeftMulti(){List<Integer> multiList = new ArrayList<>();if (adapter != null && adapter.getDatas() != null && adapter.getDatas().size() > 0){for (int i = 0; i < adapter.getDatas().size(); i++) {if (((CheckRecyclerEntity)adapter.getDatas().get(i)).leftCheck == true) {multiList.add(i);}}}return multiList;}// 多选右 返回被选中的数组public List<Integer> getRightMulti(){List<Integer> multiList = new ArrayList<>();if (adapter != null && adapter.getDatas() != null && adapter.getDatas().size() > 0){for (int i = 0; i < adapter.getDatas().size(); i++) {if (((CheckRecyclerEntity)adapter.getDatas().get(i)).rightCheck == true) {multiList.add(i);}}}return multiList;}/*** 判断在多选的情况下是否全部选择*/public boolean isAllChose(){Boolean isAllChose = true;if (adapter != null && adapter.getDatas() != null && adapter.getDatas().size() > 0) {if (isShow == 1) {for (int i = 0; i < adapter.getDatas().size(); i++) {if (((CheckRecyclerEntity)adapter.getDatas().get(i)).leftCheck == false){return false;}}} else if (isShow == 2) {for (int i = 0; i < adapter.getDatas().size(); i++) {if (((CheckRecyclerEntity)adapter.getDatas().get(i)).rightCheck == false){return false;}}} else {return false;}}else {isAllChose = false;}return isAllChose;}/*** 外部控制内部进行单选的操作*/public void setRadio(int position){if (adapter != null){adapter.checkChange(position);}}/*** 设置全选/全不选* 规则:true表示全选 false表示全不选*/public void setAllMulti(Boolean bol){if (adapter != null){adapter.setAllMulti(bol);}}/*** recycelerView 的 adapter*/public static class CheckRecyclerAdapter<T extends CheckRecyclerEntity> extends XXXRecyclerViewBaseAdapter<T>{// 记录单选的选项(用空间换时间)private int leftRadio = -1;private int rightRadio = -1;public CheckRecyclerAdapter(Context context, List dataSource) {super(context, dataSource);}@Overrideprotected BerRecyclerViewHolder getViewHolder(ViewGroup parent) {return new CheckRecyclerViewHolder(LayoutInflater.from(context).inflate(R.layout.item_check_recycler,parent,false),context);}/*** 单选*/public void checkChange(int position){if (position < dataSource.size()) {// 先将所有都设为未点击for (int i = 0; i < dataSource.size(); i++) {dataSource.get(i).leftCheck = false;dataSource.get(i).rightCheck = false;}// 再设置点击的Itemif (isShow == 1) {dataSource.get(position).leftCheck = true;leftRadio = position;}else if (isShow == 2){dataSource.get(position).rightCheck = true;rightRadio = position;}// 做响应if (radioObserver != null) {radioObserver.radioClick(position, isShow);}this.notifyDataSetChanged();}}/*** 多选*/public void multiChose(int position){// 点击后展示相反的情况if (isShow == 1) {dataSource.get(position).leftCheck = !dataSource.get(position).leftCheck;}else if (isShow == 2){dataSource.get(position).rightCheck = !dataSource.get(position).rightCheck;}// 做响应if (multiObserver != null) {multiObserver.multiClick(position, isShow);}this.notifyDataSetChanged();}/*** 设置全选*/public void setAllMulti(Boolean bol){if (isShow == 1) {for (int i = 0; i < dataSource.size(); i++) {dataSource.get(i).leftCheck = bol;}this.notifyDataSetChanged();}else if (isShow == 2){for (int i = 0; i < dataSource.size(); i++) {dataSource.get(i).rightCheck = bol;}this.notifyDataSetChanged();}}// get and setpublic int getLeftRadio() {return leftRadio;}public int getRightRadio() {return rightRadio;}}/*** recycelerView 的 viewholder*/public static class CheckRecyclerViewHolder<T extends CheckRecyclerEntity> extends XXXRecyclerViewHolder<T>{@InjectView(R.id.cb_left)CheckBox cbLeft;@InjectView(R.id.cb_right)CheckBox cbRight;@InjectView(R.id.fl_content)FrameLayout flContent;private BaseViewModel viewmodel;public CheckRecyclerViewHolder(View itemView, Context context) {super(itemView, context);ButterKnife.inject(this,itemView);if (isShow == 0){cbLeft.setVisibility(View.GONE);cbRight.setVisibility(View.GONE);}else if (isShow == 1){cbLeft.setVisibility(View.VISIBLE);cbRight.setVisibility(View.GONE);}else if (isShow == 2){cbLeft.setVisibility(View.GONE);cbRight.setVisibility(View.VISIBLE);}// 设置CheckBox的样式if (checkboxResID != 0) {cbLeft.setButtonDrawable(checkboxResID);cbRight.setButtonDrawable(checkboxResID);}// 应反射创建viewmodel对象try {Class<?> myClass = Class.forName(vmName);//完整类名Class[] paramTypes = { Context.class };Object[] params = {context};Constructor con = myClass.getConstructor(paramTypes);viewmodel = (BaseViewModel) con.newInstance(params);flContent.addView(viewmodel.getContentView());} catch (ClassNotFoundException e) {e.printStackTrace();} catch (InstantiationException e) {e.printStackTrace();} catch (IllegalAccessException e) {e.printStackTrace();} catch (NoSuchMethodException e) {e.printStackTrace();} catch (InvocationTargetException e) {e.printStackTrace();}}@Overridepublic void setDataToView() {super.setDataToView();// 处理选择框的点击 , 只做数据展示,逻辑放在外边处理cbLeft.setChecked(data.leftCheck);cbRight.setChecked(data.rightCheck);//为viewmodel添加数据viewmodel.setData(data);}/*** 接下来做 单选 和 多选 的操作 todo 先测试单选看看能不能用*/@OnClick({R.id.cb_left,R.id.cb_right})public void itemClick(View v){switch (v.getId()){case R.id.cb_left:if (isRadio) {// 单选Observable.just(getAdapterPosition()).subscribe(observer1);}else {// 多选Observable.just(getAdapterPosition()).subscribe(observer2);}break;case R.id.cb_right:if (isRadio) {Observable.just(getAdapterPosition()).subscribe(observer1);}else {Observable.just(getAdapterPosition()).subscribe(observer2);}break;}}}/*** 定义两个数据来记录是否点击选择框* 规则:调用封装的数据类要继承这个类*/public static class CheckRecyclerEntity{public boolean leftCheck;public boolean rightCheck;}/*** =======================================================================* Builder方法* ========================================================================*/public static class Builder<T extends CheckRecyclerView.CheckRecyclerEntity>{private Context context;private int isShow = 1; // 默认为显示左边的private String vmName;private List<T> datalist;//RecyclerView相关private RecyclerView.ItemDecoration itemDecoration;private RecyclerView.LayoutManager layoutManager;private int backgroupColorResID; //RecyclerView背景颜色,默认为白色// checkbox相关private int checkboxResID = 0;private boolean isRadio = true;// 定义单选(true)和多选(true)private RadioObserver radioObserver; // 监听单选private MultiObserver multiObserver; // 监听多选// 这个一定要传完整 包名+类名public Builder(Context context,String vmName){this.context = context;this.vmName = vmName;layoutManager = new LinearLayoutManager(context);backgroupColorResID = R.color.white;}public Builder setIsShow(int isShow) {this.isShow = isShow;return this;}public Builder setDatalist(List<T> datalist) {this.datalist = datalist;return this;}public Builder setItemDecoration(RecyclerView.ItemDecoration itemDecoration) {this.itemDecoration = itemDecoration;return this;}public Builder setLayoutManager(RecyclerView.LayoutManager layoutManager) {this.layoutManager = layoutManager;return this;}public Builder setCheckboxResID(int checkboxResID) {this.checkboxResID = checkboxResID;return this;}public Builder setBackgroupColorResID(int backgroupColorResID) {this.backgroupColorResID = backgroupColorResID;return this;}public Builder setIsRadio(boolean radio) {isRadio = radio;return this;}public Builder setRadioObserver(RadioObserver radioObserver) {this.radioObserver = radioObserver;return this;}public Builder setMultiObserver(MultiObserver multiObserver) {this.multiObserver = multiObserver;return this;}public CheckRecyclerView builder(){return new CheckRecyclerView(context,this);}}/*** 单选时的响应*/public interface RadioObserver{public void radioClick(int position,int isShow);}/*** 多选时的响应*/public interface MultiObserver{public void multiClick(int position,int isShow);}}代码也不能说长,500行这样,其实还好。也只封装了一些基本的功能操作,之后还可以扩展。其实我还算挺良心的,加了很多注解,我个人习惯先写注解再写方法。
基类的XXXRecyclerViewBaseAdapter和XXXRecyclerViewHolder是我自己写的Adapter和ViewHolder的基类
1.基本的流程
我有注解也不一行一行解释,主要是用了Builder模式,在外边使用时可以addView,用自定义写XML控件也行。
定义单选和多选的规则:
(1)protected static int isShow; 0 表示都不显示,1表示显示左边,2表示显示右边,默认为1
(2)protected static boolean isRadio; 表示单选/多选,true表示单选,false表示多选
定义RecyclerView
private void initView(){recyclerView = new RecyclerView(context);recyclerView.setLayoutParams(new ViewGroup.LayoutParams(ViewGroup.LayoutParams.MATCH_PARENT, ViewGroup.LayoutParams.MATCH_PARENT));recyclerView.setBackgroundResource(builder.backgroupColorResID);recyclerView.setLayoutManager(builder.layoutManager);if (builder.itemDecoration != null) {recyclerView.addItemDecoration(builder.itemDecoration);}}
数据要继承
public static class CheckRecyclerEntity{public boolean leftCheck;public boolean rightCheck;}表示左边是否点击和右边是否点击
最关键是ViewHolder的两个方法:
(1)initView
public CheckRecyclerViewHolder(View itemView, Context context) {super(itemView, context);ButterKnife.inject(this,itemView);if (isShow == 0){cbLeft.setVisibility(View.GONE);cbRight.setVisibility(View.GONE);}else if (isShow == 1){cbLeft.setVisibility(View.VISIBLE);cbRight.setVisibility(View.GONE);}else if (isShow == 2){cbLeft.setVisibility(View.GONE);cbRight.setVisibility(View.VISIBLE);}// 设置CheckBox的样式if (checkboxResID != 0) {cbLeft.setButtonDrawable(checkboxResID);cbRight.setButtonDrawable(checkboxResID);}// 应反射创建viewmodel对象try {Class<?> myClass = Class.forName(vmName);//完整类名Class[] paramTypes = { Context.class };Object[] params = {context};Constructor con = myClass.getConstructor(paramTypes);viewmodel = (BaseViewModel) con.newInstance(params);flContent.addView(viewmodel.getContentView());} catch (ClassNotFoundException e) {e.printStackTrace();} catch (InstantiationException e) {e.printStackTrace();} catch (IllegalAccessException e) {e.printStackTrace();} catch (NoSuchMethodException e) {e.printStackTrace();} catch (InvocationTargetException e) {e.printStackTrace();}
首先判断isShow 是单选/多选/隐藏 来展示页面。然后设置CheckBox的样式。
最后创建ViewModel对象添加到最上边图中实线的区域中。但是我们展示的页面并不是固定的,也就是说我们会在不同的情况创建不同的viewmodel对象,所以这里不能直接写,我用了反射来添加viewmodel,所以在上边调用的地方传了viewmodel的包名+类名,是为了用类名创建相应的viewmodel对象添加到区域中。
(2)setDataToView
@Overridepublic void setDataToView() {super.setDataToView();// 处理选择框的点击 , 只做数据展示,逻辑放在外边处理cbLeft.setChecked(data.leftCheck);cbRight.setChecked(data.rightCheck);//为viewmodel添加数据viewmodel.setData(data);}
这个就很简单了,根据leftCheck和rightCheck的值设置左右checkbox的展示,然后给viewmodel设置数据。
2.点击时的处理
做完展示时的处理之后就要做点击时的逻辑处理。
@OnClick({R.id.cb_left,R.id.cb_right})public void itemClick(View v){switch (v.getId()){case R.id.cb_left:if (isRadio) {// 单选Observable.just(getAdapterPosition()).subscribe(observer1);}else {// 多选Observable.just(getAdapterPosition()).subscribe(observer2);}break;case R.id.cb_right:if (isRadio) {Observable.just(getAdapterPosition()).subscribe(observer1);}else {Observable.just(getAdapterPosition()).subscribe(observer2);}break;}}
先判断点左还是点右,再判断是单选模式还是多选模式,我这里用了观察者模式。
// 单选情况下的观察者private static Action1<Integer> observer1 = new Action1<Integer>() {@Overridepublic void call(Integer integer) {if (adapter != null){adapter.checkChange(integer);}}};// 多选情况下的观察者private static Action1<Integer> observer2 = new Action1<Integer>() {@Overridepublic void call(Integer integer) {if (adapter != null){adapter.multiChose(integer);}}};
点击之后会在adapter中做响应操作。
/*** 单选*/public void checkChange(int position){if (position < dataSource.size()) {// 先将所有都设为未点击for (int i = 0; i < dataSource.size(); i++) {dataSource.get(i).leftCheck = false;dataSource.get(i).rightCheck = false;}// 再设置点击的Itemif (isShow == 1) {dataSource.get(position).leftCheck = true;leftRadio = position;}else if (isShow == 2){dataSource.get(position).rightCheck = true;rightRadio = position;}// 做响应if (radioObserver != null) {radioObserver.radioClick(position, isShow);}this.notifyDataSetChanged();}}/*** 多选*/public void multiChose(int position){// 点击后展示相反的情况if (isShow == 1) {dataSource.get(position).leftCheck = !dataSource.get(position).leftCheck;}else if (isShow == 2){dataSource.get(position).rightCheck = !dataSource.get(position).rightCheck;}// 做响应if (multiObserver != null) {multiObserver.multiClick(position, isShow);}this.notifyDataSetChanged();}
注释都有,算法也不难,不用详细去讲了。主要封装的逻辑其实也就这些,而其他的方法基本都是和外边交互时用到的方法,我都写了注释。
比如
/*** 外部控制内部进行单选的操作*/public void setRadio(int position){if (adapter != null){adapter.checkChange(position);}}
这个就是外面要求里面单选哪个。比如说有些需求是要默认选第一个,所以可以在外面调用checkRecyclerView.setRadio(0);
/*** 设置全选/全不选* 规则:true表示全选 false表示全不选*/public void setAllMulti(Boolean bol){if (adapter != null){adapter.setAllMulti(bol);}}
这是设置全选,比如外面点击哪个按钮后里面显示全选,那就在外面调用checkRecyclerView.setAllMulti(true);
其它的什么我都加了注释,就不都说了。
3.Builder的属性
简单介绍在Builder中定义的属性吧
(1)isShow 显示选择框在左还是右
(2)datalist需要适配的数据
(3)itemDecoration RecyclerView的分割线
(4)layoutManager RecyclerView的布局
(5)backgroupColorResID RecyclerView的颜色
(6)checkboxResID Checkbox的样式ID
(7)isRadio 单选还是多选
(8)radioObserver 单选的监听,要实现这个接口
(9)multiObserver 多选的监听
(10)vmName viewmodel的包名+类名
注意要传包名+类名,只传类名不行吗?不行,因为不同的包下可以有相同的类名,我怎么懂是要哪个。
其实我觉得代码也不算多,也不难理解,最近没时间也没能写个demo放到github上,之后闲下来再弄吧。然后也没经过严格的测试,可能一些地方写得不是很好。
更新
后来我用这个东西发现一个错的地方,就是内部类和成员都不要使用static,不然在多处使用的时候会出错。当初习惯性的会下意思使用静态内部类,后来发现用着用着就有问题了。还是太粗心了。
把代码中的静态内部类和静态成员改成非静态的就行。


