您现在的位置是:主页 > news > 怎么做网络直播卖衣服的网站/百度搜索高级搜索
怎么做网络直播卖衣服的网站/百度搜索高级搜索
![]() admin2025/6/12 15:50:39【news】
admin2025/6/12 15:50:39【news】
简介怎么做网络直播卖衣服的网站,百度搜索高级搜索,ui设计网站开发,建立目录wordpress类的装饰器 只有类、类的方法、类的属性才有装饰器。普通的方法、没有装饰器(函数存在变量提升。类不存在。方法用了装饰器会报错:Leading decorators must be attached to a class declaration)装饰器的作用是:扩充类的功能和属…
类的装饰器
- 只有类、类的方法、类的属性才有装饰器。普通的方法、没有装饰器(函数存在变量提升。类不存在。方法用了装饰器会报错:Leading decorators must be attached to a class declaration)
- 装饰器的作用是:扩充类的功能和属性。
- 使用类的装饰器,需要安装
npm install --save-dev @babel/plugin-proposal-decorators
配置package.json
"babel": {"plugins": [["@babel/plugin-proposal-decorators",{"legacy": true}]],"presets": ["react-app"]},
ps:关于变量提升。var、function有变量提升。var提升的只是声明,函数提升的是整个方法体。
es6的class let const 都没有。
几种场景
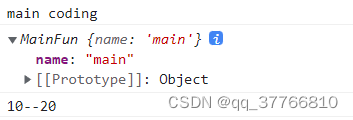
1、给类添加静态属性
// 1、只改变目标类的某个静态属性
function deco1(target) {target.age = '10--20'
}@deco1
class MainFun {constructor(name) {this.name = name}work() {console.log(this.name + ' coding')}
}let main = new MainFun('main')
main.work()
console.log(main)
console.log(MainFun.age)
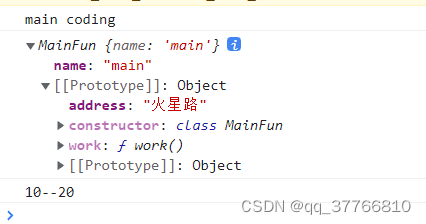
2、 带参传递,并给静态类加一个实例属性(通过原型链继承)
// 2、带参传递,并给静态类加一个实例属性(通过原型链继承)
function deco2(address) {return function (target) {target.prototype.address = address}
}
@deco1
@deco2('火星路')
class MainFun {constructor(name) {this.name = name}work() {console.log(this.name + ' coding')}
}
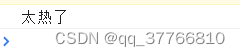
3、直接改变当前类的 只返回一个 string(正常人用不到的特殊情况)
此时就不能new MainFun 了
// 3、直接改变当前类的 只返回一个 string
function deco3(str) {return function (target) {return str}
}
@deco3('太热了')
class MainFun {constructor(name) {this.name = name}work() {console.log(this.name + ' coding')}
}
console.log(MainFun)
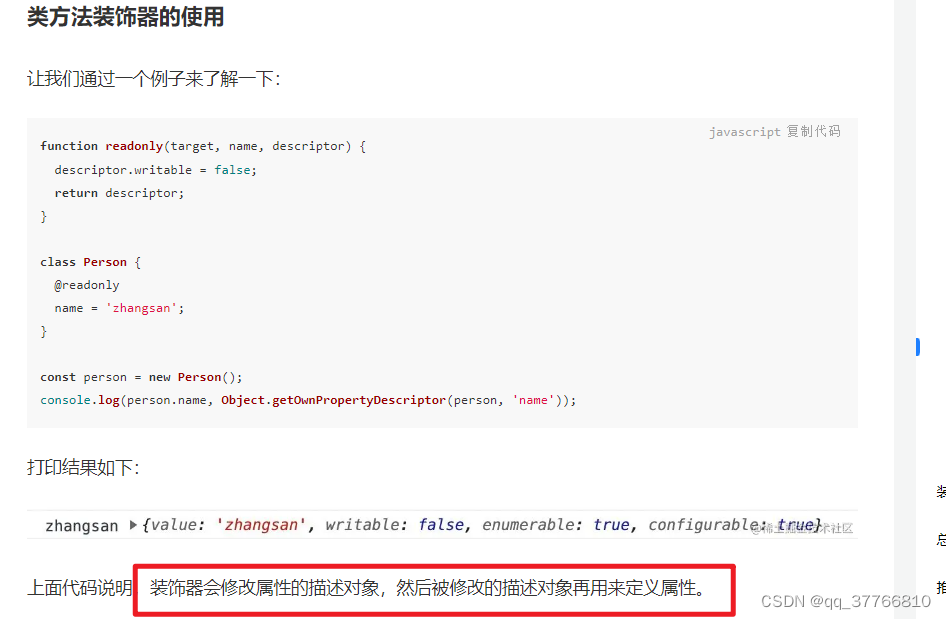
4、类方法的装饰器
类方法(或属性)的装饰器的有3个参数,分别是:类的定义、属性/方法/实例访问器属性名、属性操作符
function deco4(time) {console.log('time' + time)return function (...rest) {rest.forEach((arg, index) => {console.log(`参数${index}`, arg)})console.log('****************')}
}class MainFun {constructor(name) {this.name = name}@deco4('2022-8-2')work() {console.log(this.name + ' coding')}
}let main = new MainFun('main')
main.work()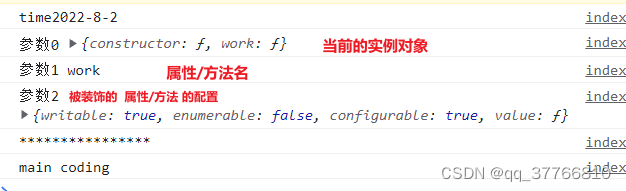
5、高阶组件
react 里使用高阶组件,其实也是装饰器的一种体现。
核心就是:传入一个组件。对其添加方法和属性。然后再传出一个组件。
我们常用的 react-redux的connect就是个高阶组件、 withRouter也是,都是给被包裹的组件提供了一些方法和props。
同时,可以利用 recompact.compose。实现多个高阶组件的嵌套与合并
funca是我自定义的一个方法。用于给接入的组件添加一个name的props
import React from 'react'const funca = Component => {return class Wc extends React.PureComponent {render() {return <Component name={12345} {...this.props} />}}
}
export default funca
下面代码里connect、withRouter是常见的高阶组件的入口函数。funca是我自定义的测试函数。
loginCheck里则有比较复杂的登录验证的逻辑。
由次可以看出recompact.compose可以帮助实现 @的作用。不用传入被包裹的组件,就能给当前组件添加一些想要的内容和逻辑
import recompact from 'recompact'
import funca from './test'const enhance = recompact.compose(connect(state => ({ loginRedux: state.loginRedux }), { loginOut }),withRouter,loginCheck('main/Show'),funca
)@enhance
class ShowMap extends React.Component {constructor(props) {super(props)this.state = {}}componentDidMount() {console.log(this.props)}render() {return <section id={styles.ShowMap}>地图</section>}
}
export default ShowMap
我们再详细看loginCheck
userName = window.sessionStorage.getItem(‘userName’)根据这个判断是否已经登录。如果是已经登录则跳转到主页面。如果没登录,则跳到登录页面
/* eslint-disable arrow-body-style */
import React from 'react'
import { Redirect } from 'react-router-dom'
import { is, fromJS } from 'immutable'/* 登陆验证 */
const LoginCheck = instance => Component => {return class WrappedComponent extends React.Component {shouldComponentUpdate(nextProps, nextState) {return (!is(fromJS(this.props), fromJS(nextProps)) || !is(fromJS(this.state), fromJS(nextState)))}render() {const props = {...this.props}const { location, loginRedux } = propsconst { url } = loginReduxconst { pathname } = locationconst userName = window.sessionStorage.getItem('userName')let redirectUrl = ''// 登录组件 登录成功后跳转至主页面'/index'if (instance === 'login') {redirectUrl = url && url !== pathname ? url : ''}// 主页面if (instance === 'main/Show') {redirectUrl = userName ? '' : url || '/login'}return (<>{redirectUrl ? <Redirect to={redirectUrl} /> : ''}{instance === 'main/Show' && !userName ? null : <Component {...props} />}</>)}}
}export default LoginCheck
装饰器参考:https://juejin.cn/post/7072883925764276254#heading-16


