您现在的位置是:主页 > news > 做网站的dw全称是啥/提高百度搜索排名工具
做网站的dw全称是啥/提高百度搜索排名工具
![]() admin2025/6/1 4:02:34【news】
admin2025/6/1 4:02:34【news】
简介做网站的dw全称是啥,提高百度搜索排名工具,企业网站建设内容,建筑工人找活的平台本文基于dubbo v2.6.x 我们在《深度解析dubbo服务远程引用(创建Proxy流程)》篇讲解了服务引用的时候使用RegistryProtocol 获得invoker,然后使用invoker封装生成代理类,其实我们在使用RegistryProtocol doRefer方法中创建了RegistryDirectory,…
本文基于dubbo v2.6.x
我们在《深度解析dubbo服务远程引用(创建Proxy流程)》篇讲解了服务引用的时候使用RegistryProtocol 获得invoker,然后使用invoker封装生成代理类,其实我们在使用RegistryProtocol doRefer方法中创建了RegistryDirectory,然后又向注册中心订阅了providers,routers,configurators,最后使用cluster的join方法生成了invoker,如果你不指定使用那个FailoverCluster,dubbo默认的invoker是FailoverClusterInvoker,我们可以看一下FailoverClusterInvoker 的invoke方法(在实际调用的时候就是走的invoke方法),invoke方法实际上是在FailoverClusterInvoker 父类AbstractClusterInvoker实现的,在父类定义了doInvoke抽象方法由子类实现,AbstractClusterInvoker 的invoke 方法中处理了传输参数的从RpcContext取出来封装到invocation中,获得了loadbalance的具体实现(这里默认使用的是random,也就是随机),获得所有服务提供者invoker集合,最后交由子类的doInvoke来做具体的一些集群容错处理,比如说快速失败,失败重试等等。
我们来看下AbstractClusterInvoker 的invoke方法

然后再来看下FailoverClusterInvoker 的doInvoke失败重试是怎样实现的(由于代码太多没法贴图,直接粘源码了)
/*** 进行调用* @param invocation 封装调用信息实体* @param invokers 服务提供者invoker集合* @param loadbalance 具体某个负载均衡策略* @return 执行结果* @throws RpcException*/@Override@SuppressWarnings({"unchecked", "rawtypes"})public Result doInvoke(Invocation invocation, final List<Invoker<T>> invokers, LoadBalance loadbalance) throws RpcException {List<Invoker<T>> copyinvokers = invokers;checkInvokers(copyinvokers, invocation);// 检验参数// 获取重试次数,如果没有设置,就是用默认2+1 加1 操作是本身要调用一次,然后如果失败了 再重试调用1次int len = getUrl().getMethodParameter(invocation.getMethodName(), Constants.RETRIES_KEY, Constants.DEFAULT_RETRIES) + 1;if (len <= 0) {len = 1;}// retry loop.RpcException le = null; // last exception. 异常List<Invoker<T>> invoked = new ArrayList<Invoker<T>>(copyinvokers.size()); // invoked invokers.Set<String> providers = new HashSet<String>(len);for (int i = 0; i < len; i++) {//Reselect before retry to avoid a change of candidate `invokers`.//NOTE: if `invokers` changed, then `invoked` also lose accuracy.if (i > 0) {checkWhetherDestroyed(); //检验是否已经销毁copyinvokers = list(invocation); // 获取所有的invokers// check againcheckInvokers(copyinvokers, invocation);}// 选择一个invokerInvoker<T> invoker = select(loadbalance, invocation, copyinvokers, invoked);invoked.add(invoker); // 添加到已经选择的列表中// 将已经选择过的invoker列表设置到context中RpcContext.getContext().setInvokers((List) invoked);try {// 调用 获得结果Result result = invoker.invoke(invocation);if (le != null && logger.isWarnEnabled()) {//重试过程中,将最后一次调用的异常信息以 warn 级别日志输出logger.warn("Although retry the method " + invocation.getMethodName()+ " in the service " + getInterface().getName()+ " was successful by the provider " + invoker.getUrl().getAddress()+ ", but there have been failed providers " + providers+ " (" + providers.size() + "/" + copyinvokers.size()+ ") from the registry " + directory.getUrl().getAddress()+ " on the consumer " + NetUtils.getLocalHost()+ " using the dubbo version " + Version.getVersion() + ". Last error is: "+ le.getMessage(), le);}return result;} catch (RpcException e) {if (e.isBiz()) { // biz exception. // 如果是业务性质的异常,不再重试,直接抛出throw e;}le = e; // 其他性质的异常统一封装成RpcException} catch (Throwable e) {le = new RpcException(e.getMessage(), e);} finally {// 将提供者的地址添加到providersproviders.add(invoker.getUrl().getAddress());}}// 最后抛出异常throw new RpcException(le != null ? le.getCode() : 0, "Failed to invoke the method "+ invocation.getMethodName() + " in the service " + getInterface().getName()+ ". Tried " + len + " times of the providers " + providers+ " (" + providers.size() + "/" + copyinvokers.size()+ ") from the registry " + directory.getUrl().getAddress()+ " on the consumer " + NetUtils.getLocalHost() + " using the dubbo version "+ Version.getVersion() + ". Last error is: "+ (le != null ? le.getMessage() : ""), le != null && le.getCause() != null ? le.getCause() : le);}}我们可以看到就是直接使用for循环完成的失败重试,如果是业务异常就不会再走下次循环结束重试,如果是非业务异常就进行失败重试,然后根据负载均衡算法(这个后面会有文章单独讲解)从服务提供者invoker集合中找一个合适的,然后执行服务提供者invoker的invoke方法进行调用。
那么问题来了,服务提供者invoker集合是怎么来的? 这个问题也是我们本篇要讲解的
根据我们上面的介绍,invokers是AbstractClusterInvoker的invoke方法获得的,也就是下面这段代码

我们看下list方法

是从directory对象获得的,这directory 对象其实是我们在RegistryProtocol的doRefer方法中创建出来的

我们接着看下directory 的list方法,这是在RegistryDirectory父类AbstractDirectory中实现的,然后子类实现doList方法(可以发现都是一个套路,哈哈哈哈)

可以看出来是子类实现的doList方法获得的invokers,接着往下看看子类(我们这边指的是RegistryDirectory)是怎样实现的

我们可以看到,是从methodInvokerMap里面根据key找invoker的,关键点就是咱们这个methodInvokerMap

这里我们就需要研究下methodInvokerMap里面的内容是怎么来的了。
我们首先看下RegistryDirectory 类定义

这里实现了NotifyListener 接口

这个接口有一个notify()方法,我们在refer的时候,向注册中心订阅了providers,routers,configurators组,当有变动的时候,注册中心就会调用咱们这个NotifyListener 的notify来进行通知,我们看下RegistryDirectory的notify实现

我们可以看到这个方法,首先创建几个集合,这个是分组用的,接着就是遍历url,对url进行分组,不同类型的url就会被add到对应的集合中,再往下就是转换,比如说configuratorUrls集合转成configurators ,routerUrls集合中转成Router ,我们可以最后一行就是将invokerUrls转成invoker集合。我们看下这个refreshInvoker方法。
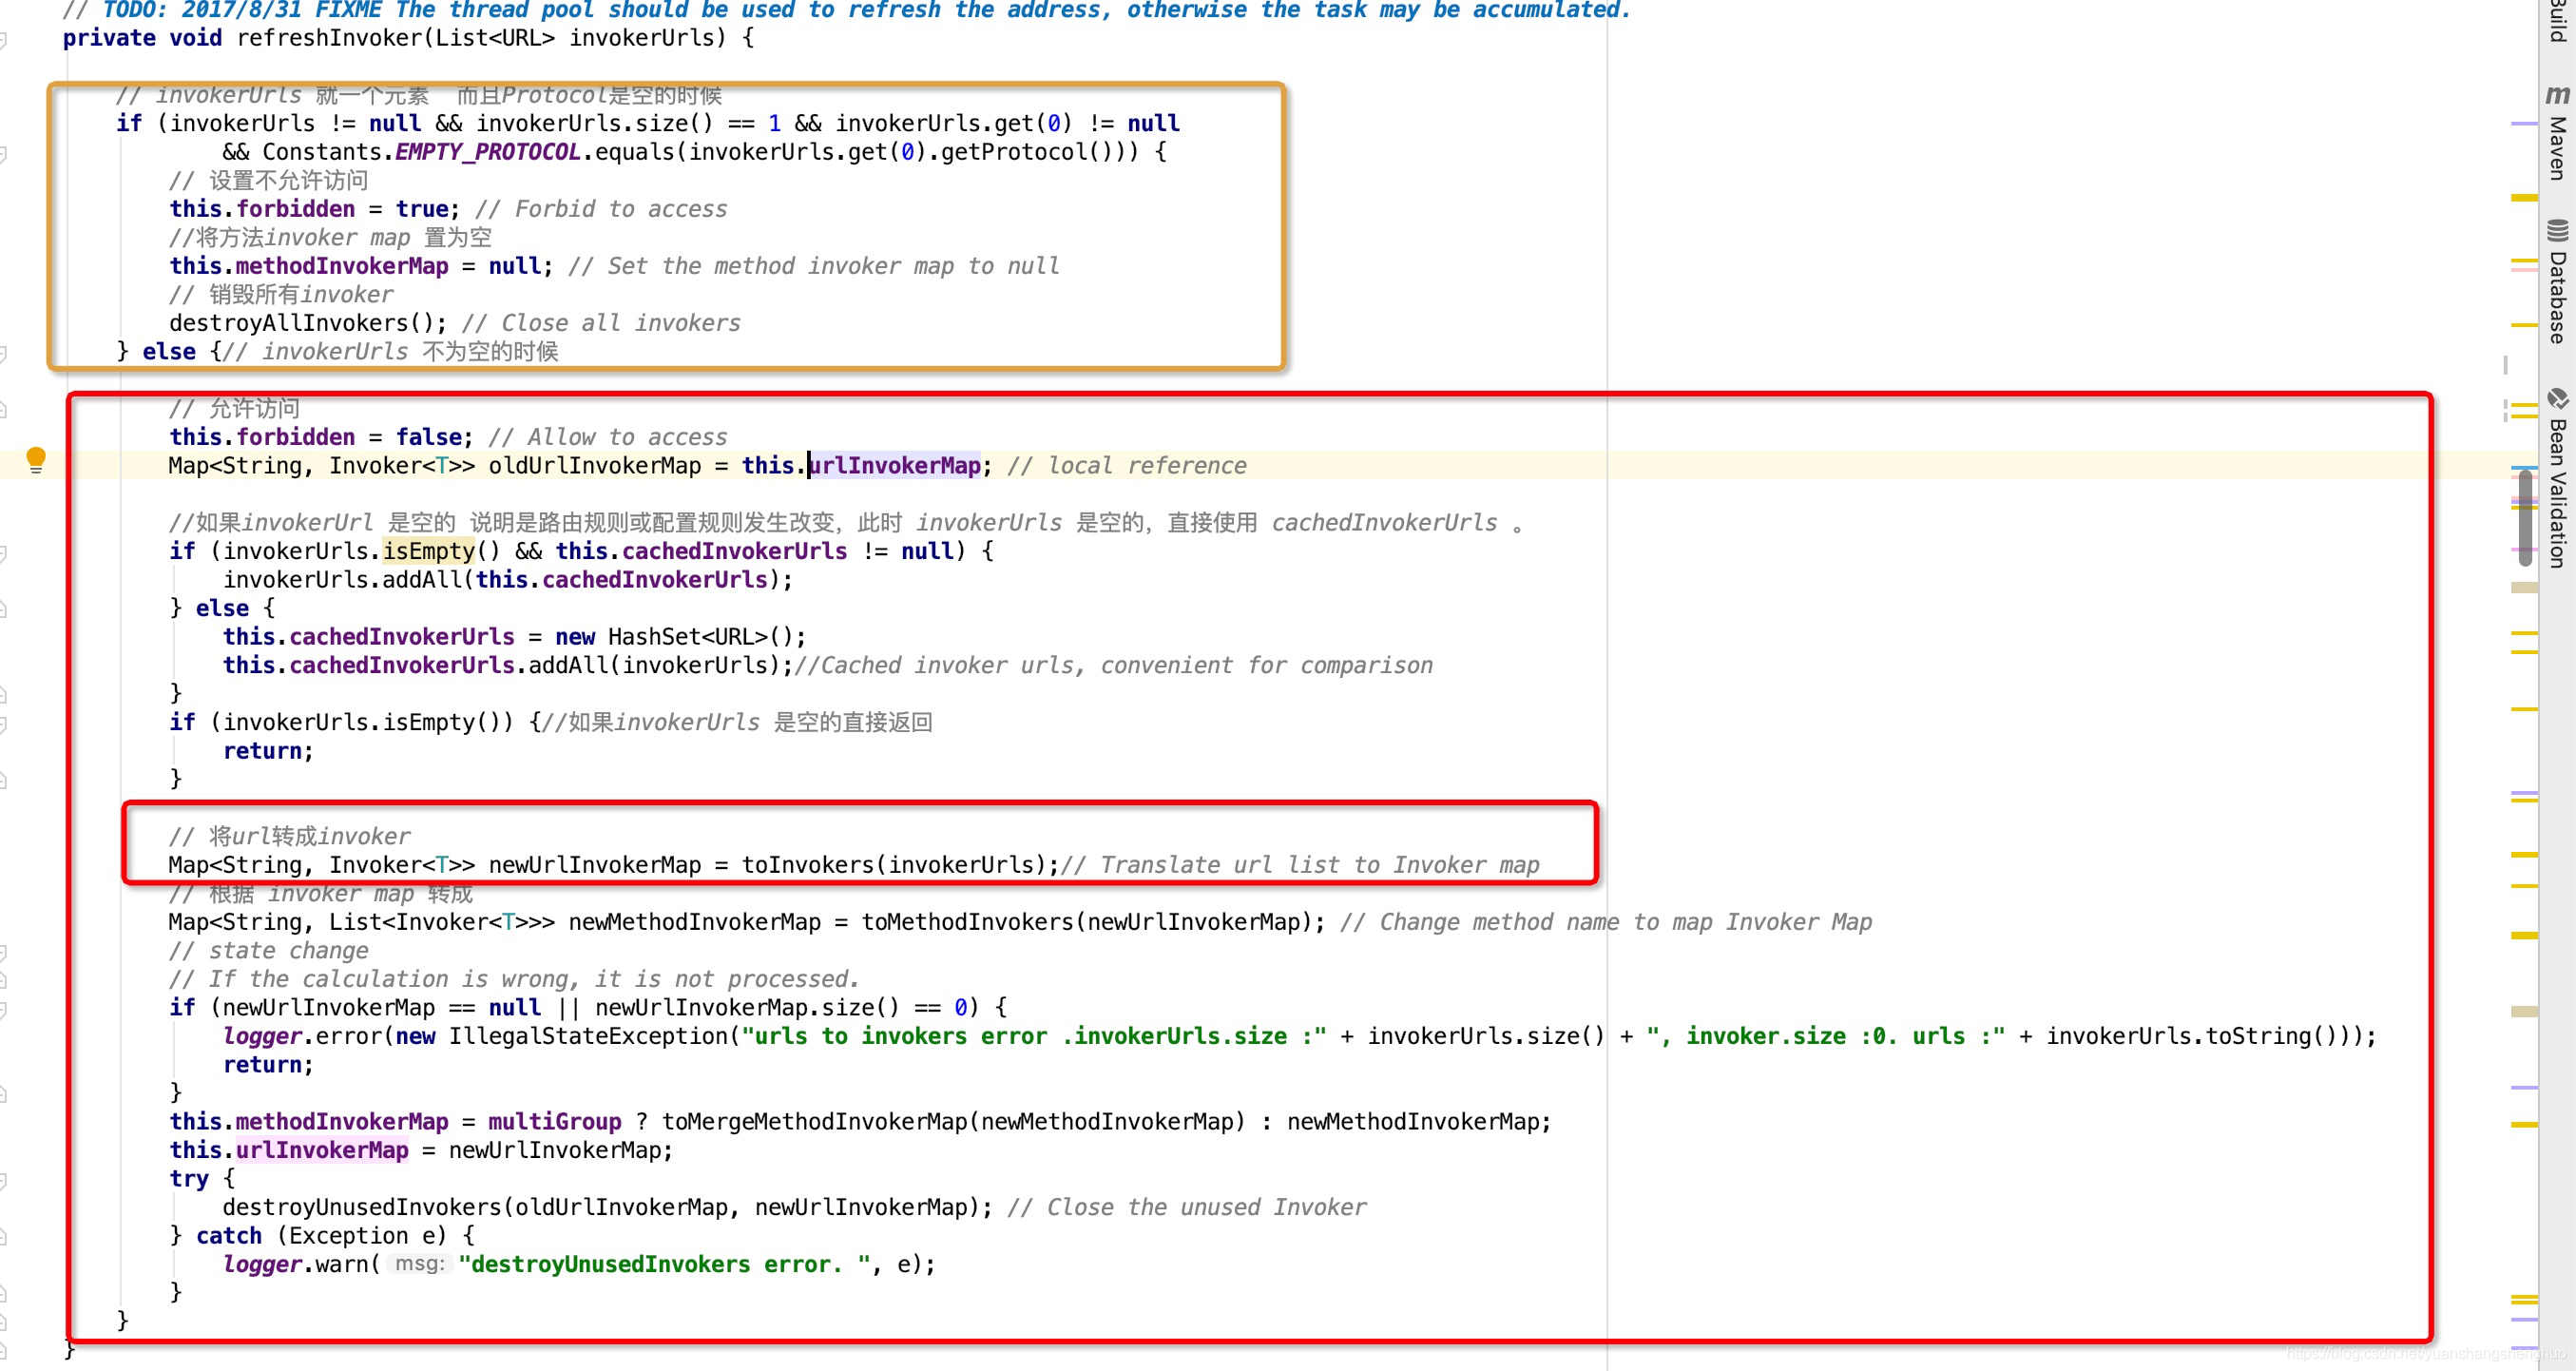
黄框这块我们不用关心,我们主要是看下这个红框里面的内容,前半部分就是就是处理缓存问题,就是invokerUrl是空的,然后缓存不是空的,就将缓存的添加到这invokerUrl中,否则就将这个invokerUrl中的内容缓存起来。再往下看可以看到调用了toInvokers方法,将invokerUrl转成了map。然后又有个toMethodInvoker拿这上面转的结果又转成这个methodInvokerMap,最后将methodInvokerMap 赋值给我们成员变量methodInvokerMap ,也就是我们上面看到的,接下来我们需要看下这个toInvoker是怎样将url转成invoker的。
/*** Turn urls into invokers, and if url has been refer, will not re-reference.* 将url转成invoker* @param urls* @return invokers*/private Map<String, Invoker<T>> toInvokers(List<URL> urls) {Map<String, Invoker<T>> newUrlInvokerMap = new HashMap<String, Invoker<T>>();if (urls == null || urls.isEmpty()) {// 是空的直接返会空mapreturn newUrlInvokerMap;}Set<String> keys = new HashSet<String>();String queryProtocols = this.queryMap.get(Constants.PROTOCOL_KEY);//获取consumer 的 protocolfor (URL providerUrl : urls) {// If protocol is configured at the reference side, only the matching protocol is selectedif (queryProtocols != null && queryProtocols.length() > 0) {boolean accept = false;String[] acceptProtocols = queryProtocols.split(",");for (String acceptProtocol : acceptProtocols) {if (providerUrl.getProtocol().equals(acceptProtocol)) {accept = true;break;}}if (!accept) {continue;}}if (Constants.EMPTY_PROTOCOL.equals(providerUrl.getProtocol())) {//如果是个empty protocol直接跳过去continue;}if (!ExtensionLoader.getExtensionLoader(Protocol.class).hasExtension(providerUrl.getProtocol())) {// 服务提供者协议不存在的时候抛出异常logger.error(new IllegalStateException("Unsupported protocol " + providerUrl.getProtocol() + " in notified url: " + providerUrl + " from registry " + getUrl().getAddress() + " to consumer " + NetUtils.getLocalHost()+ ", supported protocol: " + ExtensionLoader.getExtensionLoader(Protocol.class).getSupportedExtensions()));continue;}URL url = mergeUrl(providerUrl);// 处理了一下providerUrlString key = url.toFullString(); // The parameter urls are sortedif (keys.contains(key)) { // Repeated urlcontinue;}keys.add(key);// Cache key is url that does not merge with consumer side parameters, regardless of how the consumer combines parameters, if the server url changes, then refer againMap<String, Invoker<T>> localUrlInvokerMap = this.urlInvokerMap; // local referenceInvoker<T> invoker = localUrlInvokerMap == null ? null : localUrlInvokerMap.get(key);// 根据key从缓存里面获取invokerif (invoker == null) { // Not in the cache, refer againtry {boolean enabled = true;if (url.hasParameter(Constants.DISABLED_KEY)) {enabled = !url.getParameter(Constants.DISABLED_KEY, false);//disabled} else {enabled = url.getParameter(Constants.ENABLED_KEY, true);//enabled}if (enabled) {// 这里生成一个invokerinvoker = new InvokerDelegate<T>(protocol.refer(serviceType, url), url, providerUrl);}} catch (Throwable t) {logger.error("Failed to refer invoker for interface:" + serviceType + ",url:(" + url + ")" + t.getMessage(), t);}if (invoker != null) { // Put new invoker in cachenewUrlInvokerMap.put(key, invoker);}} else {newUrlInvokerMap.put(key, invoker);}}keys.clear();return newUrlInvokerMap;}
我们可以看到这个方法里面就是遍历url,然后循环前半部分判断一些东西,不符合的直接略过去,后半部分就是生成invoker了

最终是protocol.refer(serviceType, url)这句话生成的,使用InvokerDelegate这个类将生成的invoker与url,providerUrl绑在了一起。
这个protocol.refer(serviceType, url)的protocol就是Protocol接口实现类,根据dubbo spi自适应技术,根据url里面的protocol属性,又加上dubbo spi 的setter ,wrapper特性,最后调用的就是DubboProtocol 外面包装了一堆Wrapper类,调用关系如下:

最终就是调用的DubboProtocol的refer方法,我们看下代码

我这都有注释,可以看下,很简单,这里有个getClients方法需要我们往下看

这里我们看下getSharedClient 方法获取共享的client

这里我就不再细贴代码了,因为没有特别难的逻辑,就是调用的层次比较深,层与层转换比较多,我这里整理了一份调用逻辑,直达创建客户端。

到这里我们这个initClient就结束了,本篇虽然标题是initClient,但是实际上我们讲的最细的是toInvoker,毕竟标题难起啊。。。


