您现在的位置是:主页 > news > 网站管理包括/百度电商平台app
网站管理包括/百度电商平台app
![]() admin2025/5/15 4:45:35【news】
admin2025/5/15 4:45:35【news】
简介网站管理包括,百度电商平台app,广东睿营建设有限公司网站,做美妆网站的关键词目录 1、商城系统简介 2、模板技术 2.1、介绍 2.2、模板技术与前端框架的区别 3、整合thymeleaf渲染商城首页 3.1、环境准备 3.1.1、【商品模块】导入thymeleaf和热部署依赖 3.1.2、静态资源添加到商品模块 3.1.3、controller包改名为app、新增web包 3.1.4、yml关…
目录
1、商城系统简介
2、模板技术
2.1、介绍
2.2、模板技术与前端框架的区别
3、整合thymeleaf渲染商城首页
3.1、环境准备
3.1.1、【商品模块】导入thymeleaf和热部署依赖
3.1.2、静态资源添加到商品模块
3.1.3、controller包改名为app、新增web包
3.1.4、yml关闭thymeleaf缓存
3.1.5、启动测试
3.2、开发首页跳转功能
3.3、编写查询一级目录列表接口
3.4、商城首页渲染一级分类
3.5、商品二、三级分类分类的预期响应JSON
3.6、根据一级分类id查询二级三级分类
3.6.1、新增Catalog2Vo实体类
3.6.2、新增接口
3.6.3、新增查询出父ID为 parent_cid的List集合
3.6.4、修改请求
3.6.5、重启服务并测试
3.7、总结springboot页面跳转
3.7.1、静态页面
3.7.2、动态页面
4、nginx搭建域名访问环境
4.1、需求
4.2、回顾反向代理
4.3、配置反向代理
4.3.1、hosts文件配置域名和ip映射
4.3.2、配置nginx.conf
4.3.3、配置/etc/nginx/conf.d/gulimall.conf
4.3.4、网关配置“gulimall.com”的路由规则
4.3.5、坑点:Nginx代理给网关时会丢失请求的host等信息
4.3.6、测试通过
4.3.7、小结,反向代理流程
1、商城系统简介
我们的商城系统本应该也是前后端分离的,就像后台管理系统那样,然而出于教学考虑,前后端分离的话就会屏蔽掉很多细节,所以我们进行服务端的页面渲染式开发(有点儿类似freemarker)
动静分离:nginx在后面部署的时候,我们可以将微服务中的页面的静态资源部署到nginx中。分担微服务的压力。
静指的是:图片、js、css等静态资源(以实际文件存在的方式)
每一个微服务只来管理自己的页面,最终做到每一个微服务都可以独立部署、运行、升级。
每个微服务都是独立自治的,每一个微服务的数据库、技术都是自治的。不一定商品服务用java开发,用php、js都可以,无论是从技术层面、架构层面还是业务都是独立自治的。
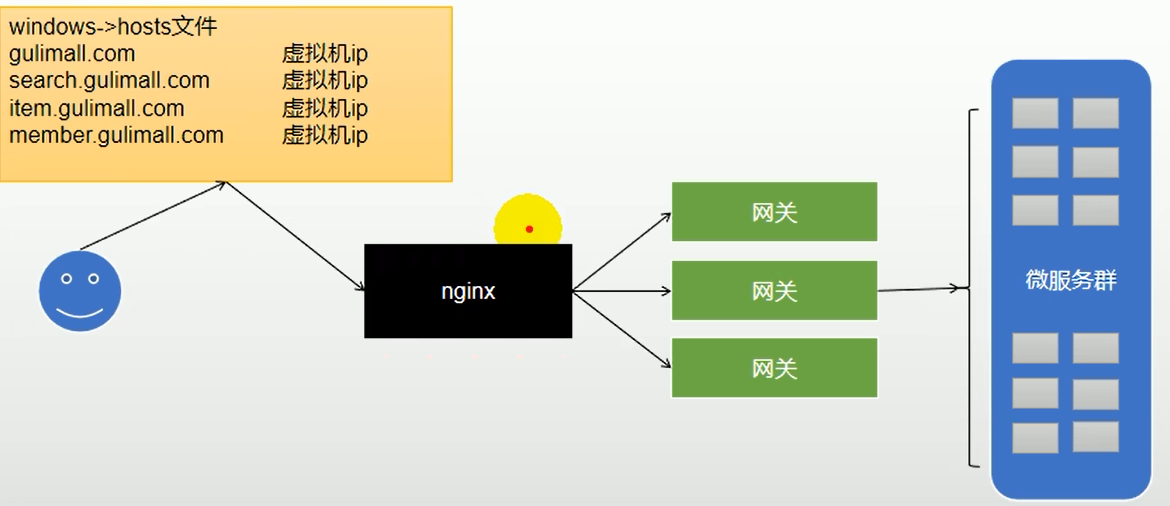
用户先访问Nginx,Nginx反向代理将请求转发到网关,网关路由到各个服务。网关可以请求路由、鉴权认证、限流等。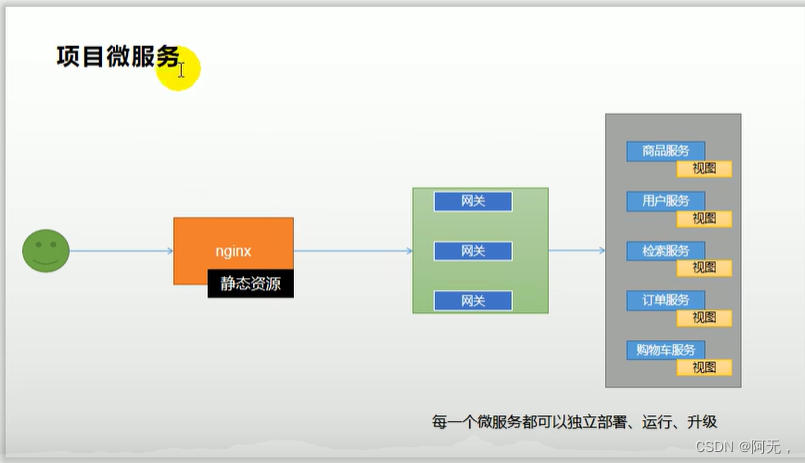
2、模板技术
2.1、介绍
模板技术:把页面中的静态数据替换成从后台数据库中的数据。
这种操作用jsp就可以实现。但是Spring boot 的架构不推荐使用Jsp,而且支持也不好,所以如果你是用springboot的话,一般使用Freemarker或者Thymeleaf 。
Thymeleaf模板引擎是自然化语言,编写的页面前端可以直接使用。
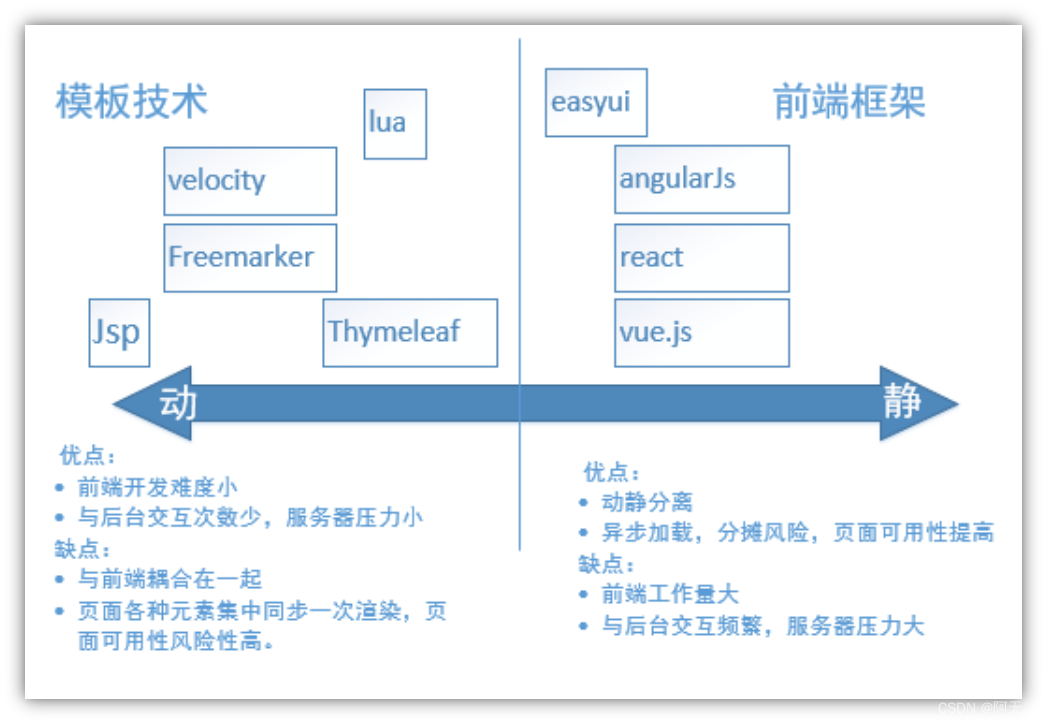
2.2、模板技术与前端框架的区别
3、整合thymeleaf渲染商城首页
3.1、环境准备
3.1.1、【商品模块】导入thymeleaf和热部署依赖
<!--        页面渲染我们使用thymeleaf,这应该和freemarker是差不多的,都是模板引擎-->
<!--        优点:它是一个自然化语言,编写的语言前端可以直接使用,方便前后人员的分工合作-->
<!--        缺点:性能比其他模板引擎要低一点,但是我们在生产环境开启了它的缓存功能,性能也是很高的--><dependency><groupId>org.springframework.boot</groupId><artifactId>spring-boot-starter-thymeleaf</artifactId></dependency>
<!--热部署--><dependency><groupId>org.springframework.boot</groupId><artifactId>spring-boot-devtools</artifactId><optional>true</optional></dependency>
3.1.2、静态资源添加到商品模块
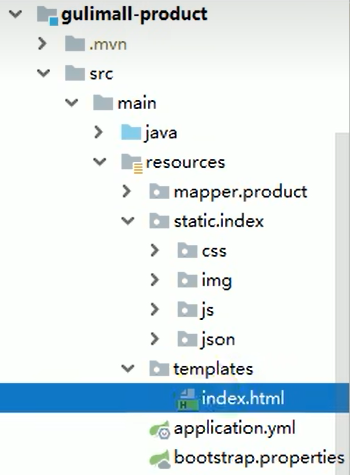
将静态资源复制到static下,index.html要复制到templates下。
3.1.3、controller包改名为app、新增web包
将controller包改名为app,新增web包。以后所有rest接口从app包提供,所有controller从web包提供。
web包下的controller是返回给thymeleaf的,它默认的前缀和后缀分别是classpath:/templates/和.html,springboot访问项目的时候自动会找index.html
3.1.4、yml关闭thymeleaf缓存
# 关闭thymeleaf缓存,以便于修改代码后刷新页面能看出修改
spring:thymeleaf:cache: false
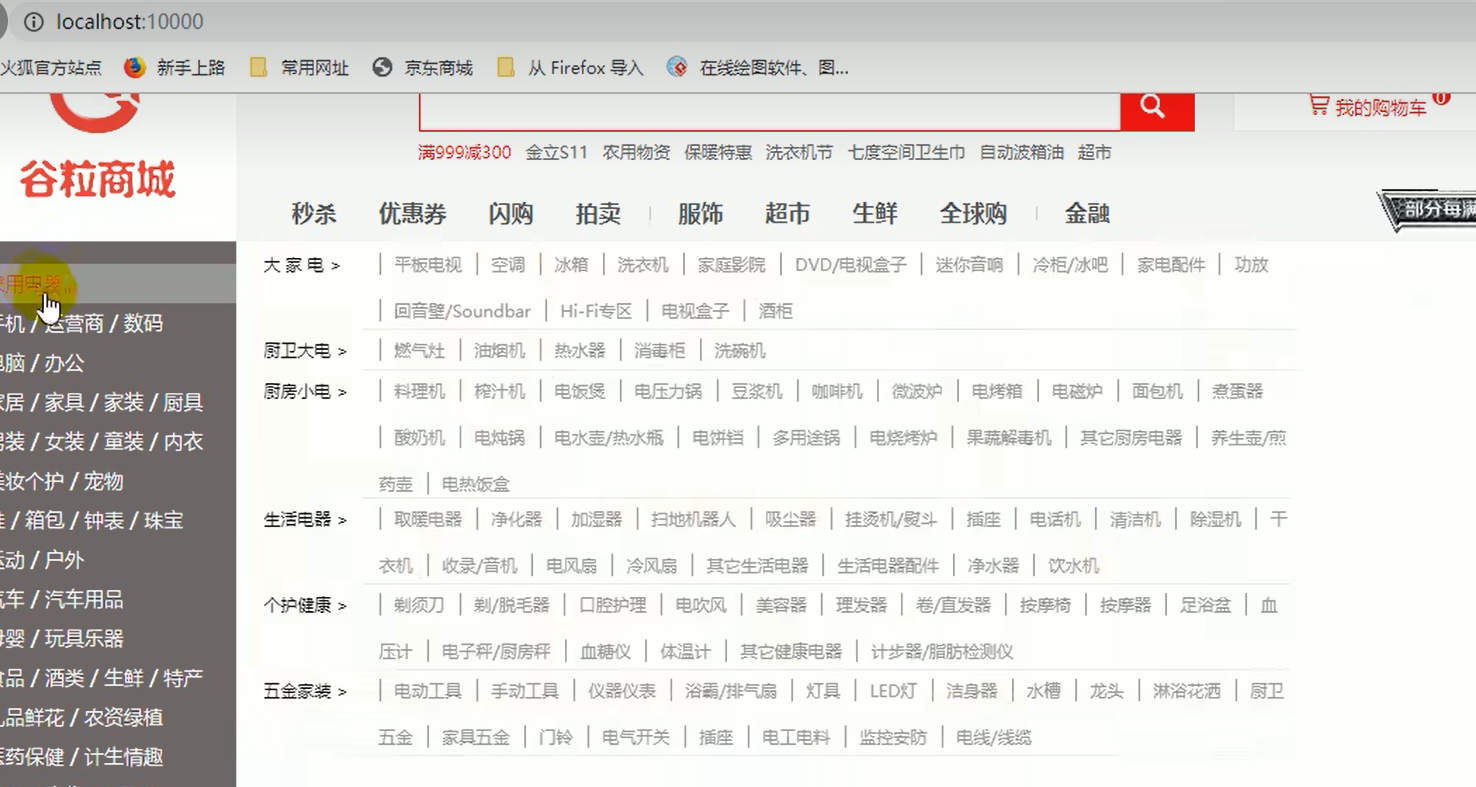
3.1.5、启动测试
启动商品模块,可以发现所有静态资源都是可以访问的。springboot默认访问index.html。
3.2、开发首页跳转功能
商品模块新增gulimall/product/web/IndexController.java
package xx.xx.gulimall.product.web;@Controller
public class IndexController {@AutowiredCategoryService categoryService;@GetMapping({"/","index.html"})public String indexPage(Model model){    //传参Model类// TODO 1、查出所有1级分类List<CategoryEntity> categoryEntitys = categoryService.getLevel1Categorys();model.addAttribute("categories",categoryEntities);return "index";    //相当于return "index.html"; 拦截GetMapping路径后转到首页}
}
3.3、编写查询一级目录列表接口
gulimall-product/src/main/java/site/zhourui/gulimall/product/service/CategoryService.java
新增接口
List<CategoryEntity> getLevel1Categorys();
gulimall-product/src/main/java/site/zhourui/gulimall/product/service/impl/CategoryServiceImpl.java
实现新增接口
/*** 查询一级分类。* 父ID是0, 或者 层级是1*/@Overridepublic List<CategoryEntity> getLevel1Categorys() {System.out.println("调用了 getLevel1Categorys 查询了数据库........【一级分类】");return baseMapper.selectList(new QueryWrapper<CategoryEntity>().eq("parent_cid", 0));}
3.4、商城首页渲染一级分类
首页使用thymeleaf
html标签上加上xmlns:th="http://www.thymeleaf.org"
<html lang="en" xmlns:th="http://www.thymeleaf.org">
遍历IndexController 传过来的categorys
<div class="header_main_left"><ul><li th:each=" category : ${categorys}"><a href="http://search.gulimall.com/" class="header_main_left_a" th:attr="ctg-data=${category.catId}"><b th:text="${category.name}">家用电器</b></a></li></ul></div>
重启商品服务
一级目录变为数据库查询出的目录
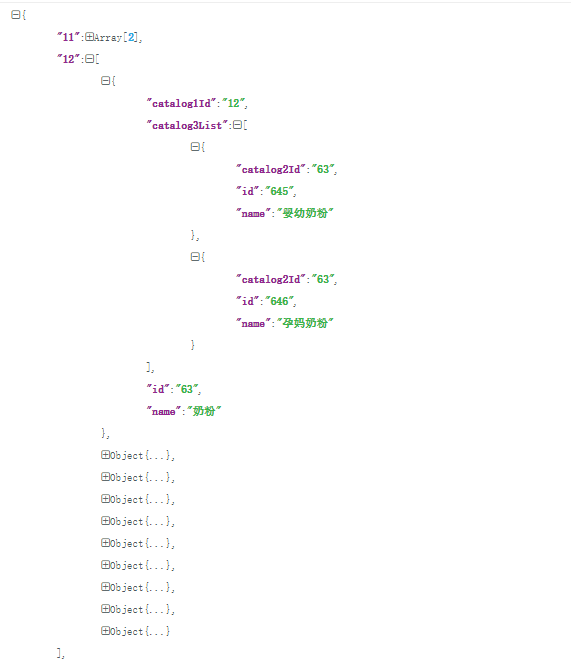
3.5、商品二、三级分类分类的预期响应JSON
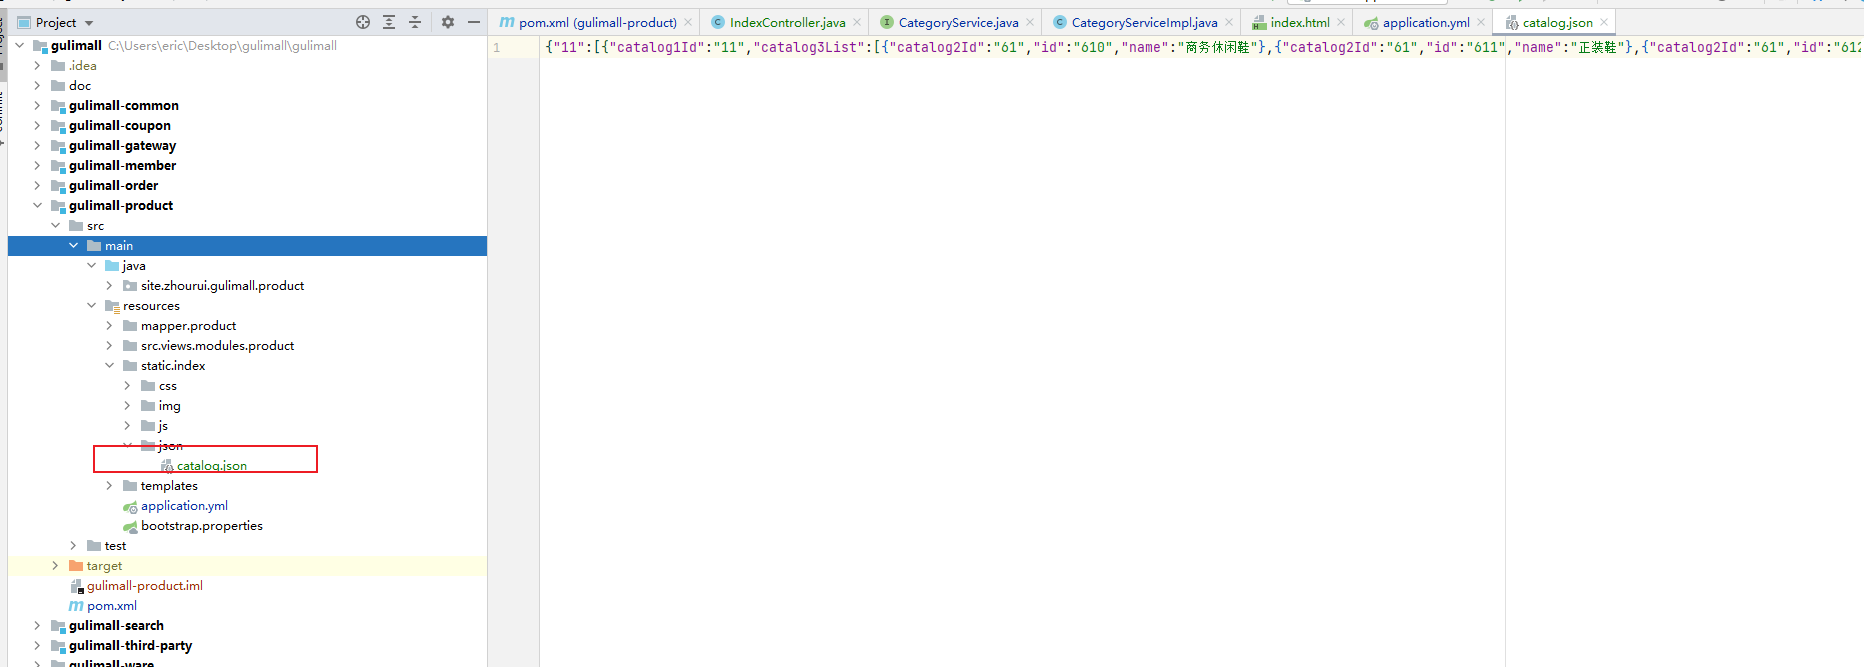
商品二级三级分类的数据在gulimall-product/src/main/resources/static/index/json/catalog.json
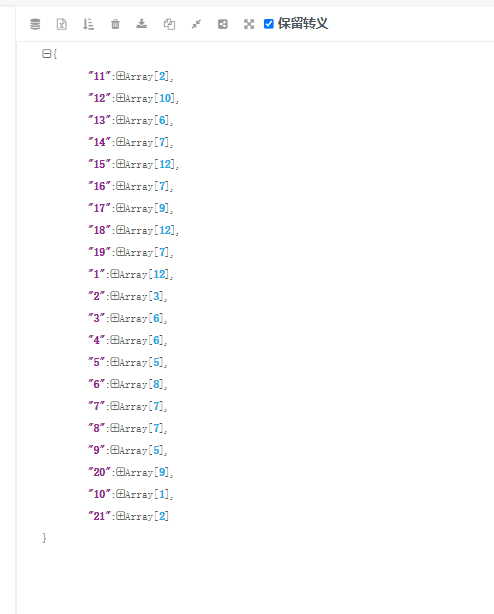
我们需要封装与catalog.json结构相同的数据
将catalog.json格式化
发现是一个map类型的结构 key为一级类目id的值,value为一级类目下的所有二级目录的数组
打开二级目录数组
发现一个对象数组,每一个对象代表一个二级分类,catalog3List就是该二级分类的三级分类的集合
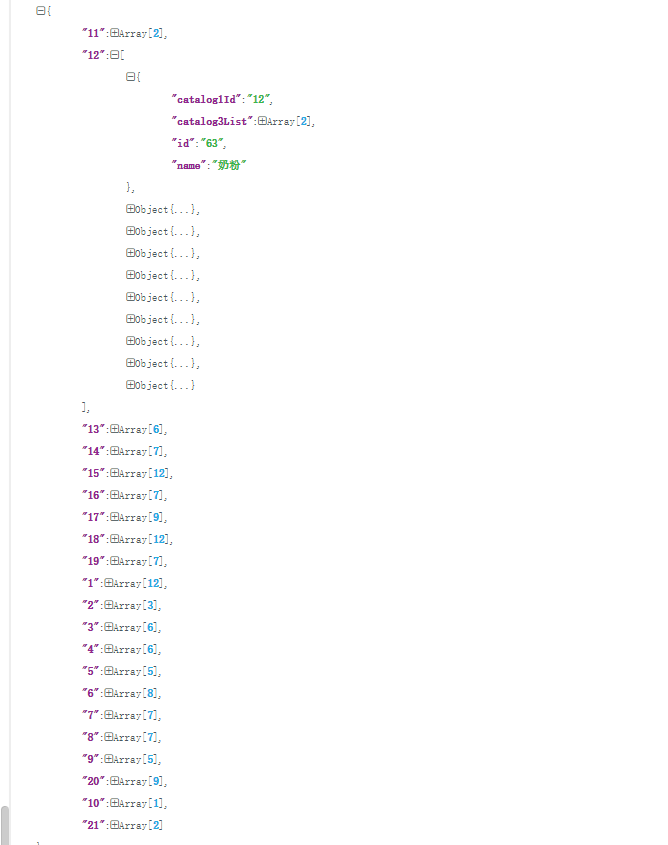
打开catalog3List
是一个一个的三级分类
3.6、根据一级分类id查询二级三级分类
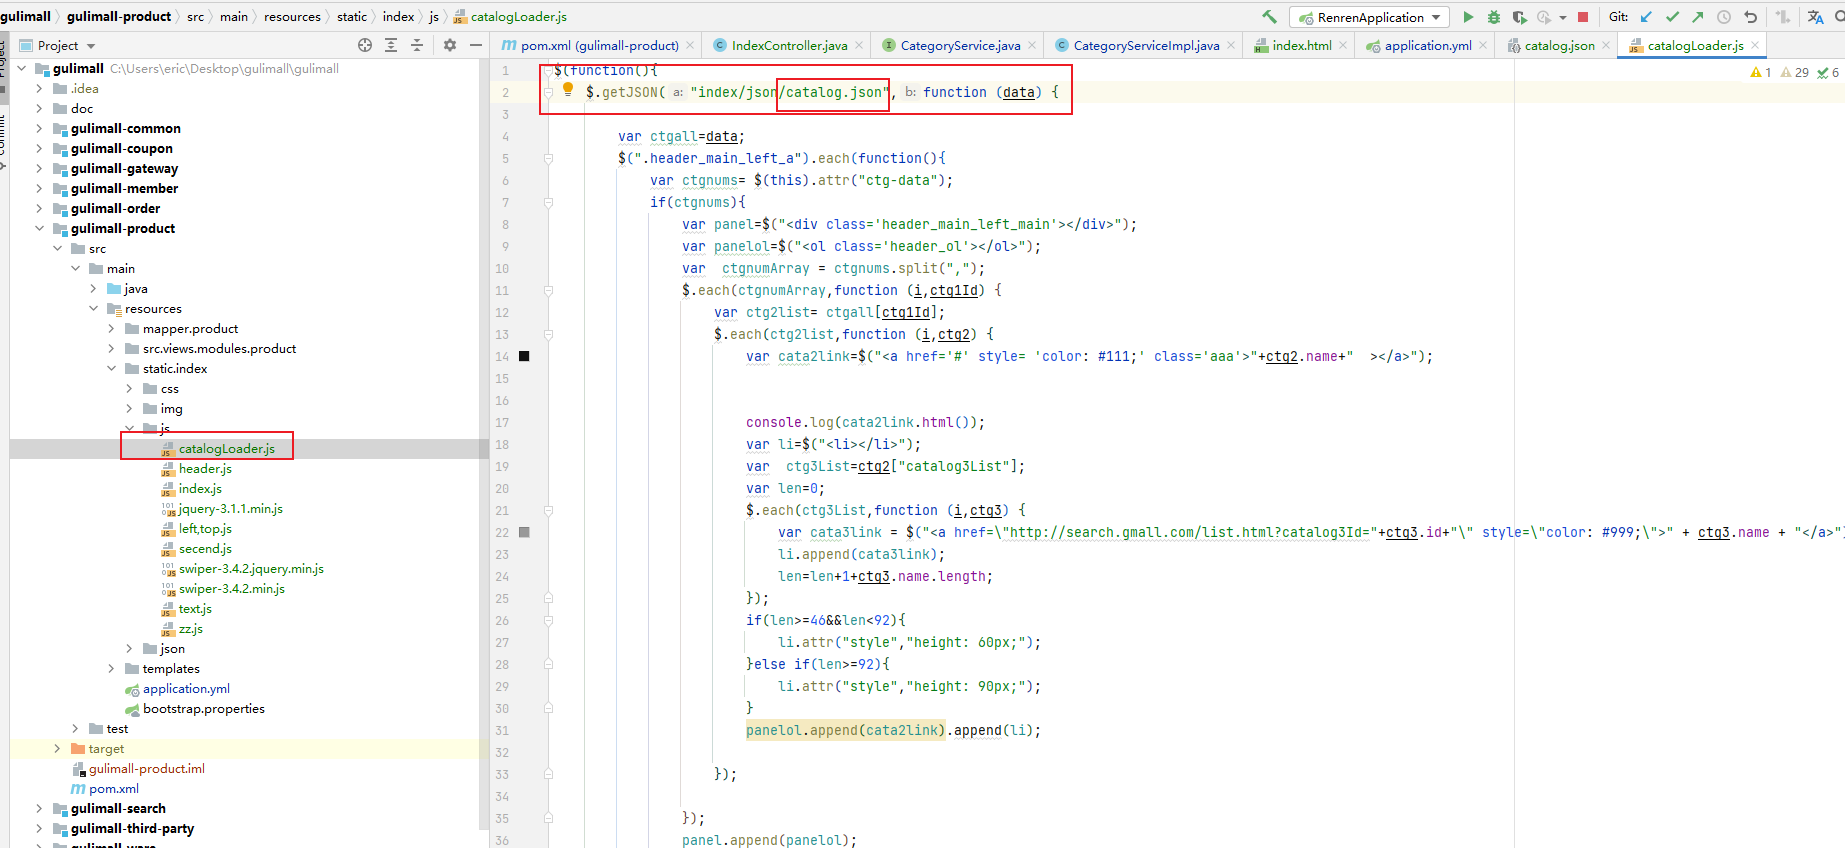
发现gulimall-product/src/main/resources/static/index/js/catalogLoader.js处调用了catalog.json
3.6.1、新增Catalog2Vo实体类
按照章节8分析的结构创建
package xx.xx.gulimall.product.vo;
@NoArgsConstructor
@AllArgsConstructor
@Data
public class Catalog2Vo {private String catalog1Id;  // 1级父分类IDprivate List<Catalog3Vo> catalog3List;// 3级子分类集合private String id;  // 2级分类IDprivate String name;  // 2级分类name/*** 三级分类Vo*/@NoArgsConstructor@AllArgsConstructor@Datapublic static class Catalog3Vo {private String catalog2Id;  // 2级父分类IDprivate String id;  // 3级分类IDprivate String name;  // 3级分类name}
}
3.6.2、新增接口
/*** 查出三级分类* 1级分类作为key,2级引用List*/
@ResponseBody
@GetMapping("/index/catalog.json")
public Map<String, List<Catalog2Vo>> getCatalogJson() {Map<String, List<Catalog2Vo>> map = categoryService.getCatalogJson();return map;
}
gulimall-product/src/main/java/com/atguigu/gulimall/product/service/CategoryService.java
Map<String, List<Catalog2Vo>> getCatalogJson();
gulimall-product/src/main/java/com/atguigu/gulimall/product/service/impl/CategoryServiceImpl.java
@Overridepublic Map<String, List<Catalog2Vo>> getCatalogJson() {// 一次性获取所有 数据List<CategoryEntity> selectList = baseMapper.selectList(null);System.out.println("调用了 getCatalogJson 查询了数据库........【三级分类】");// 1)、所有1级分类List<CategoryEntity> level1Categorys = getParent_cid(selectList, 0L);// 2)、封装数据Map<String, List<Catalog2Vo>> collect = level1Categorys.stream().collect(Collectors.toMap(k -> k.getCatId().toString(), level1 -> {// 查到当前1级分类的2级分类List<CategoryEntity> category2level = getParent_cid(selectList, level1.getCatId());List<Catalog2Vo> catalog2Vos = null;if (category2level != null) {catalog2Vos = category2level.stream().map(level12 -> {// 查询当前2级分类的3级分类List<CategoryEntity> category3level = getParent_cid(selectList, level12.getCatId());List<Catalog2Vo.Catalog3Vo> catalog3Vos = null;if (category3level != null) {catalog3Vos = category3level.stream().map(level13 -> {return new Catalog2Vo.Catalog3Vo(level12.getCatId().toString(), level13.getCatId().toString(), level13.getName());}).collect(Collectors.toList());}return new Catalog2Vo(level1.getCatId().toString(), catalog3Vos, level12.getCatId().toString(), level12.getName());}).collect(Collectors.toList());}return catalog2Vos;}));return collect;}
3.6.3、新增查询出父ID为 parent_cid的List集合
gulimall-product/src/main/java/com/atguigu/gulimall/product/service/impl/CategoryServiceImpl.java
/*** 查询出父ID为 parent_cid的List集合*/private List<CategoryEntity> getParent_cid(List<CategoryEntity> selectList, Long parent_cid) {return selectList.stream().filter(item -> item.getParentCid() == parent_cid).collect(Collectors.toList());//return baseMapper.selectList(new QueryWrapper<CategoryEntity>().eq("parent_cid", level.getCatId()));}
3.6.4、修改请求
gulimall-product/src/main/resources/static/index/js/catalogLoader.js
修改请求路径为章节9新增的接口路径index/catalog.json
3.6.5、重启服务并测试
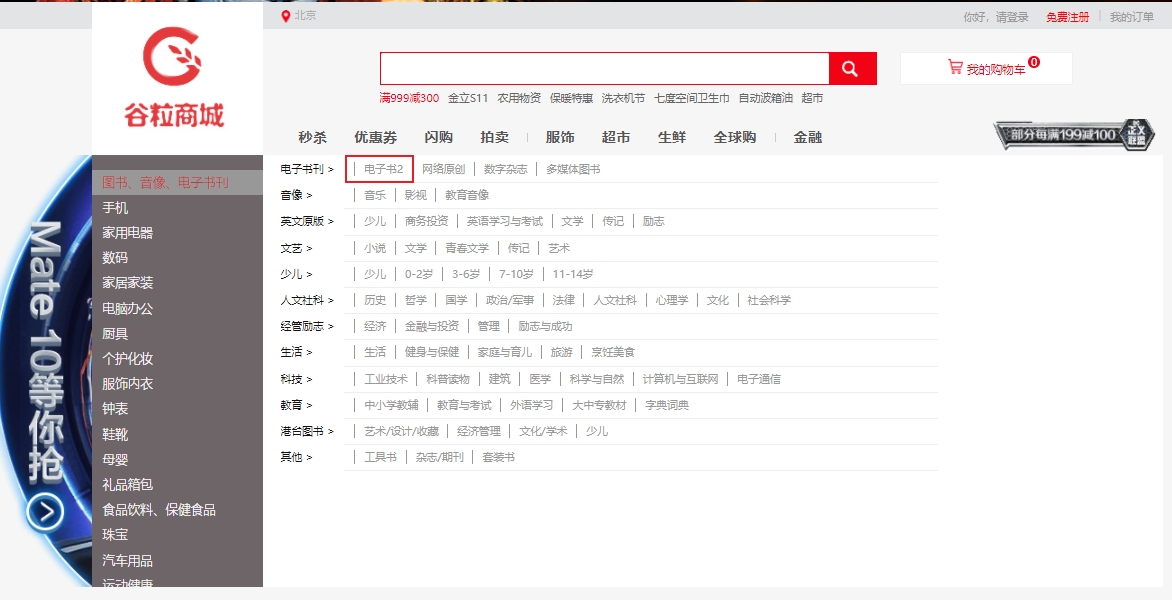
数据库修改三级分类名
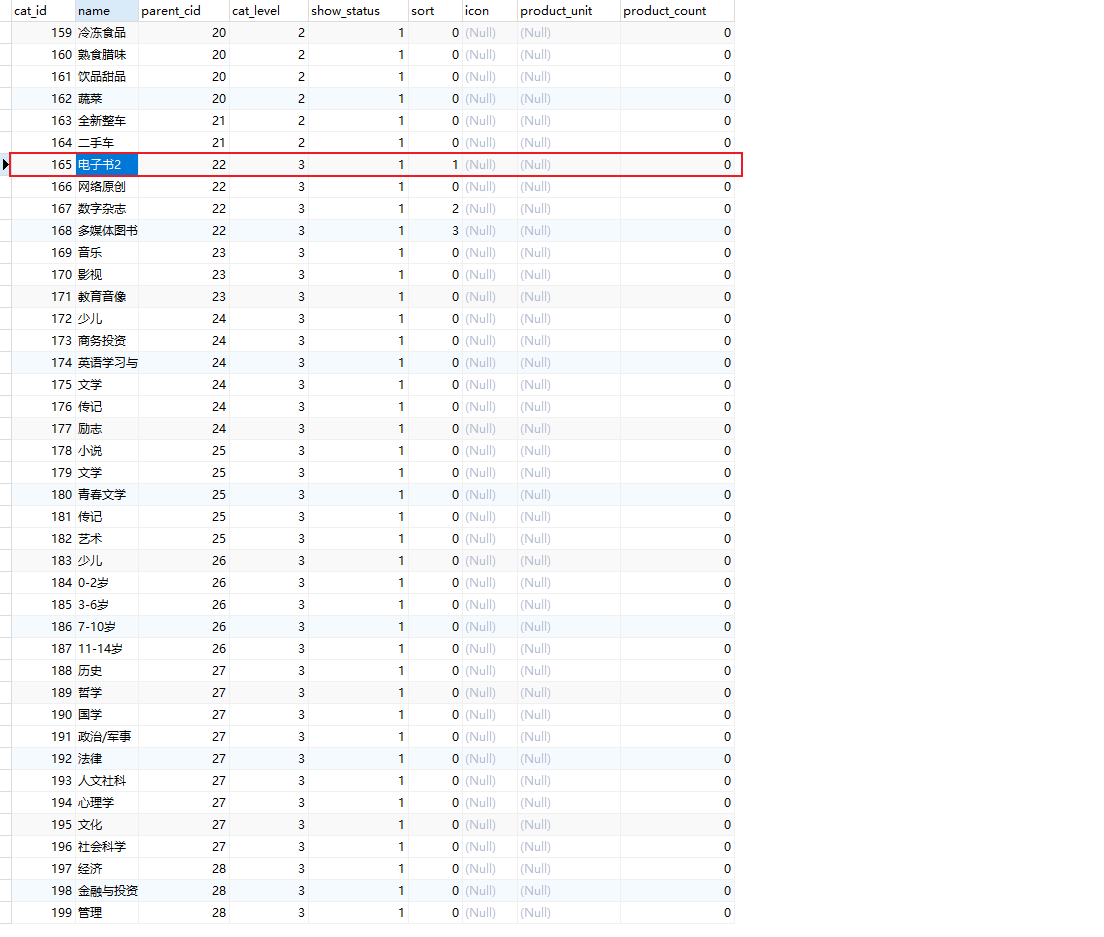
页面刷新后也相应改变,说明使用的是后台来的数据
3.7、总结springboot页面跳转
静态页面就是不需要任何后台数据的获取,单纯获取这个页面,动态页面则反之。
在springboot项目template下的html用一个点击事件从后台controller跳转页面也不行。
在src/main/resources下面有两个文件夹,static和templates,springboot默认static中放静态页面和静态资源文件,而templates中放动态页面,动态页面访问的话需要Thymeleaf的依赖,动态页面需要从后台Controller跳转,静态页面直接类似于:http://127.0.0.1:8080/index.html 访问就可以了;如果static下的无法访问,首先你要保证了你这几个文件访问,不会被拦截器干掉
SpringBoot项目中static目录和templates目录,默认static中放静态资源文件,例如:img、js、css、font等等,如果静态html页面放在static下,一是可以直接当做静态资源访问;另外如果有一种情况,如果页面是放在static下面的,同时也需要从controller来跳转,那么可以采用重定向的方式,因为spring boot 默认的模板存放在 /resource/templates下,不会到 static 目录下去寻找。redirect其实就是重定向到外部资源;其实动态页面放在templates下,大家也都知道,需要从Controller来跳转访问,这些都是SpringBoot约定成俗的一些配置;
3.7.1、静态页面
静态页面是可以直接访问的,在static目录下新建一个hello.html就可以在浏览器直接访问http://localhost:8080/hello.html,也可以通过controller层跳转访问。
@Controller
public class HelloController {@RequestMapping("/hello")public String hello() { return "hello.html"; }
}
这里返回值是页面,如果方法加注解@ResponseBody,返回值则是字符串。
3.7.2、动态页面
动态页面的访问需要先请求服务器,访问后台的应用程序,然后再转向访问页面。
spring boot默认使用thymeleaf做动态页面,建议不要使用jsp,下面是spring boot整合thymeleaf的写法
<dependency><groupId>org.springframework.boot</groupId><artifactId>spring-boot-starter-thymeleaf</artifactId>
</dependency>
-
在tempates目录下新建hello.html文件,此时若直接访问http://localhost:8080/hello.html访问的是静态文件夹(static目录)下的hello.html,再通过controller层跳转访问static会报500错误,这是因为
- 静态页面的return默认是跳转到static目录下的
- 当引入thymeleaf之后,动态跳转会覆盖默认的静态跳转
- 动态跳转默认跳转到templates目录下
- 两者return代码区别:动态跳转有无.html后缀都可
使用thymeleaf之后的controller层
@Controller
public class HelloController {@RequestMapping("/hello")public String hello() { return "hello"; }
}若在使用动态页面时还想跳转到/static/index.html,使用重定向return “redirect:/index.html”
4、nginx搭建域名访问环境
4.1、需求
访问“gulimall.com”,Nginx反向代理到网关地址“http://localhost:88/#”,展示商品页面。
网关端口是88。
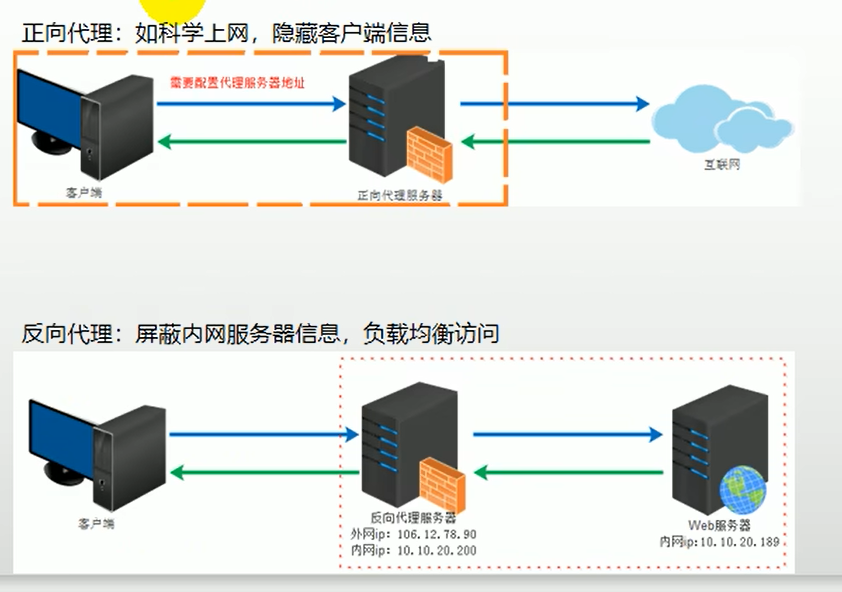
4.2、回顾反向代理
正向代理:客户端向代理服务器发请求并指定目标服务器,代理向目标服务器转交请求并将获得的内容返回给客户端。
反向代理:用户直接访问反向代理服务器就可以获得目标服务器的资源。反向代理服务器统一了访问入口。
4.3、配置反向代理
4.3.1、hosts文件配置域名和ip映射
方法一:直接修改
windows域名解析会先找C:\Windows\System32\drivers\etc下的hosts文件,然后才找dns服务器
当我们在浏览器输入gulimall.com的时候,就会去找我们的虚拟机,此时虚拟机中的nginx是运行的话,就可以访问到nginx,因为nginx监听的是80端口
192.168.56.10 gulimall.com
方法二:管理员身份打开软件SwitchHosts,添加新方案:
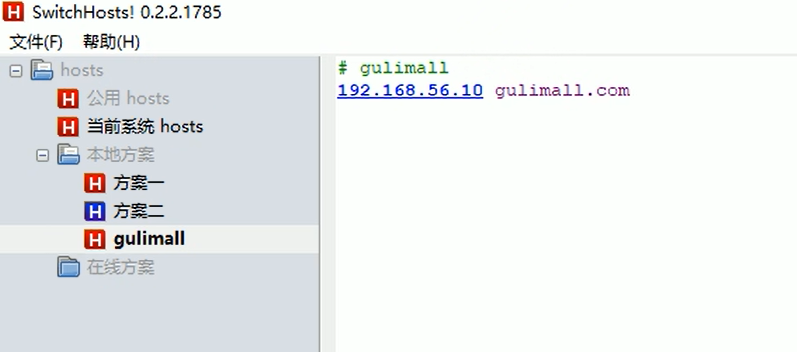
测试成功:
4.3.2、配置nginx.conf
首先docker安装Nginx,配置自启动。
cd /mydata/nginx
cd conf
vi nginx.conf
user nginx;
worker_processes 1;error_log /var/log/nginx/error.log warn;
pid /var/run/nginx.pid;events {worker_connections 1024;
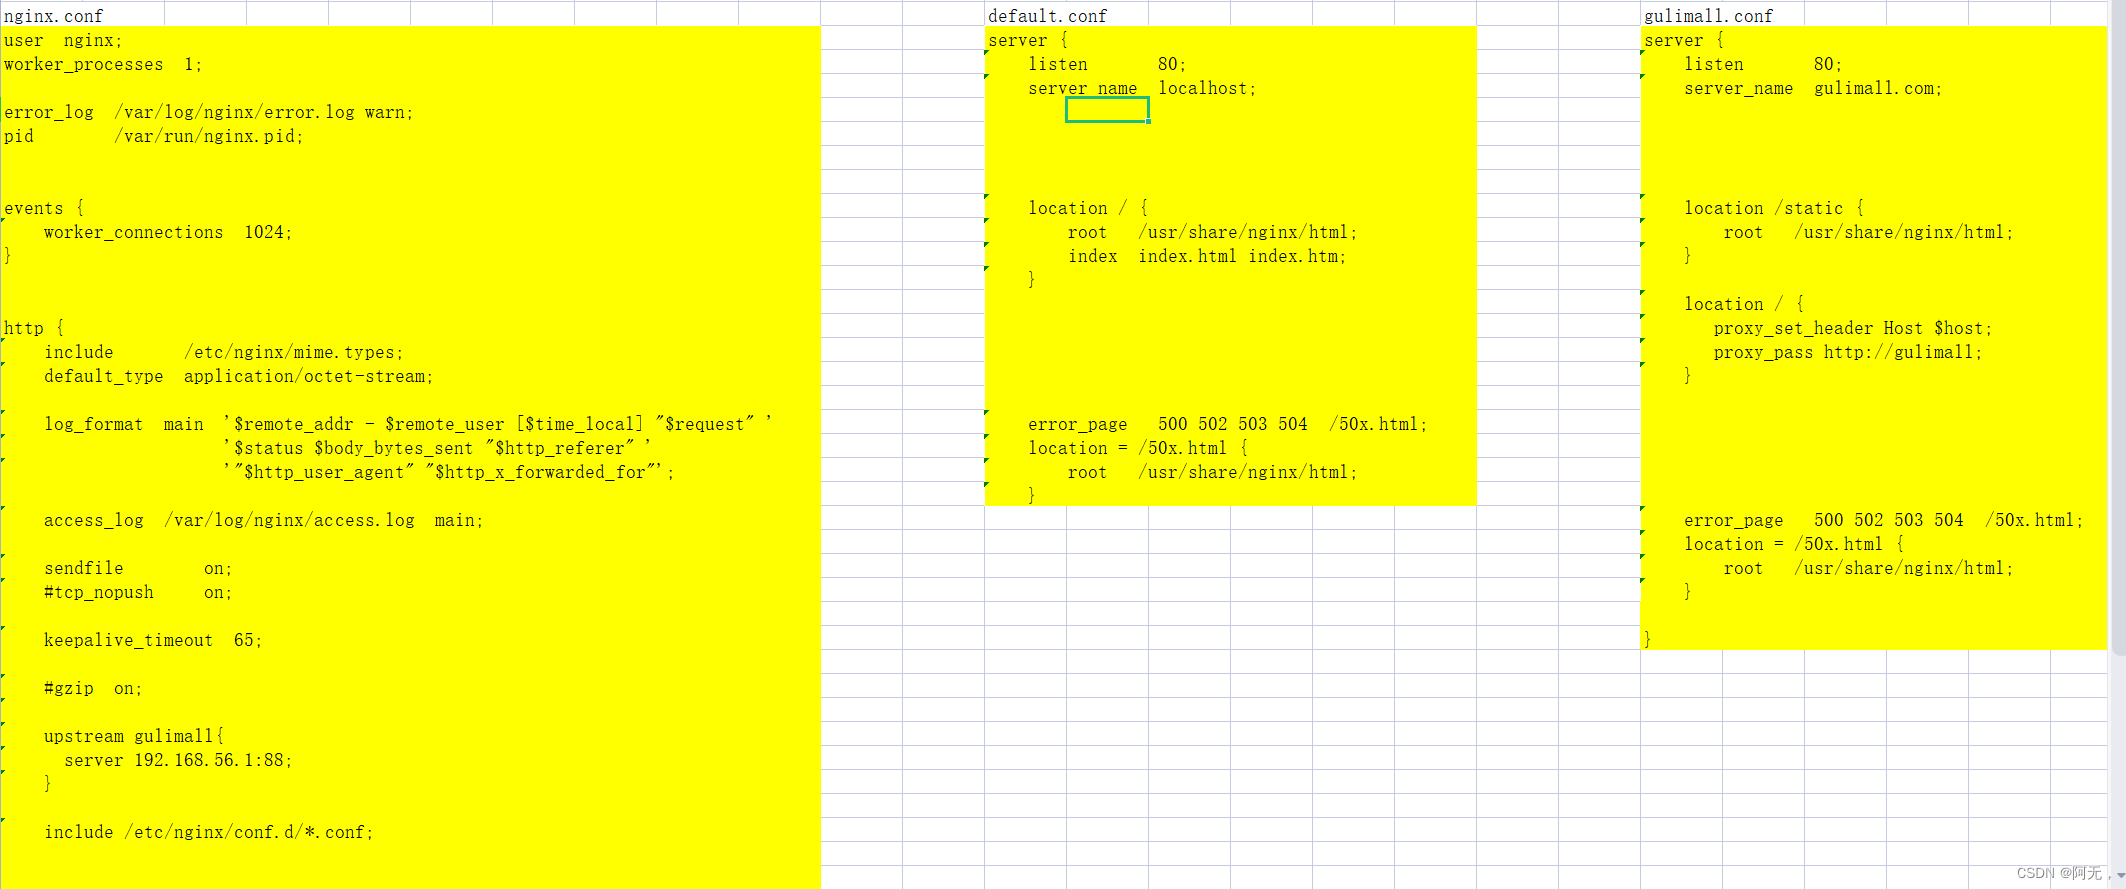
}http {include /etc/nginx/mime.types; #支持的mime类型default_type application/octet-stream; #默认数据类型log_format main '$remote_addr - $remote_user [$time_local] "$request" ' #日志格式'$status $body_bytes_sent "$http_referer" ''"$http_user_agent" "$http_x_forwarded_for"';access_log /var/log/nginx/access.log main; #日志地址sendfile on;#tcp_nopush on;keepalive_timeout 65;#gzip on; #开启压缩upstream gulimall{ #配置上游服务器,起名为gulimallserver 192.168.56.1:88; #配置上游服务器为网关地址}include /etc/nginx/conf.d/*.conf; #该路径下的配置文件会全部合并到这里}
4.3.3、配置/etc/nginx/conf.d/gulimall.conf
此配置文件被Nginx的http全局块配置了包含。
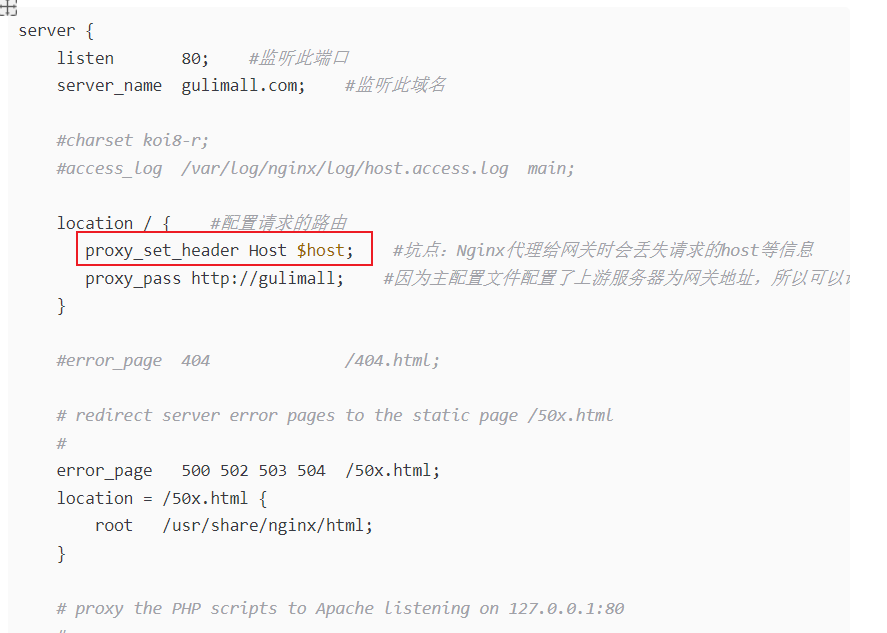
server {listen       80;    #监听此端口server_name  gulimall.com;    #监听此域名#charset koi8-r;#access_log  /var/log/nginx/log/host.access.log  main;location / {    #配置请求的路由proxy_set_header Host $host;    #坑点:Nginx代理给网关时会丢失请求的host等信息proxy_pass http://gulimall;    #因为主配置文件配置了上游服务器为网关地址,所以可以请求路由到http://192.168.xxx.xxx:10000/}#error_page  404              /404.html;# redirect server error pages to the static page /50x.html#error_page   500 502 503 504  /50x.html;location = /50x.html {root   /usr/share/nginx/html;}# proxy the PHP scripts to Apache listening on 127.0.0.1:80##location ~ \.php$ {#    proxy_pass   http://127.0.0.1;#}# pass the PHP scripts to FastCGI server listening on 127.0.0.1:9000##location ~ \.php$ {#    root           html;#    fastcgi_pass   127.0.0.1:9000;#    fastcgi_index  index.php;#    fastcgi_param  SCRIPT_FILENAME  /scripts$fastcgi_script_name;#    include        fastcgi_params;#}# deny access to .htaccess files, if Apache's document root# concurs with nginx's one##location ~ /\.ht {#    deny  all;#}
}
配置完成后重启Nginx容器。
4.3.4、网关配置“gulimall.com”的路由规则
注意:域名映射只能放在最后面,否则会覆盖上面的“/api/xxx”路径
spring:cloud:gateway:routes:
#        - id: test_route
#          uri: https://www.baidu.com
#          predicates:
#            #              根据参数来匹配
#            - Query=url,baidu# 和admin_route顺序不能乱,否则页面访问报404,因为被它拦截了# 我们一般把精确的路由放在上面,优先级高# 匹配了这个路由之后,不会匹配下面的路由- id: product_routeuri: lb://gulimall-productpredicates:- Path=/api/product/**# 前端的请求是 http://localhost:88/api/product/category/list/tree# 后端实际需要的请求是,http://localhost:12000/product/category/list/treefilters:- RewritePath=/api/(?<segment>.*),/$\{segment}#  http://localhost:88/api/thirdparty/oss/policy- id: third_party_route#  lb 负载均衡uri: lb://gulimall-third-party# 匹配所有以api开头的请求predicates:- Path=/api/thirdparty/**filters:#  路径重写# (?<segment>.*)  $\{segment} 相当于片段- RewritePath=/api/thirdparty/(?<segment>.*),/$\{segment}- id: member_route#  lb 负载均衡uri: lb://gulimall-member# 匹配所有以api开头的请求predicates:- Path=/api/member/**filters:#  路径重写# (?<segment>.*)  $\{segment} 相当于片段- RewritePath=/api/(?<segment>.*),/$\{segment}- id: ware_routeuri: lb://gulimall-warepredicates:- Path=/api/ware/**filters:- RewritePath=/api/(?<segment>.*),/$\{segment}#  前端项目发送请求都以 /api 开头- id: admin_route#  lb 负载均衡  到renren-fast服务uri: lb://renren-fast# 匹配所有以api开头的请求predicates:- Path=/api/**filters:#  路径重写# http://localhost:88/api/captcha.jpg 在网关匹配到相应的规则后#  就变成了 http://localhost:8080/api/captcha.jpg# 但实际上我们需要真正访问的是 http://localhost:8080/renren-fast/captcha.jpg# (?<segment>.*)  $\{segment} 相当于片段- RewritePath=/api/(?<segment>.*),/renren-fast/$\{segment}# 域名映射只能放在最后面,否则会覆盖上面的api路径# 例如我们访问product的api路径,优先匹配到这个的话就会去直接找product# 不会再路径重写了- id: gulimall_host_routeuri: lb://gulimall-productpredicates:- Host=**.gulimall.com
4.3.5、坑点:Nginx代理给网关时会丢失请求的host等信息
4.3.6、测试通过
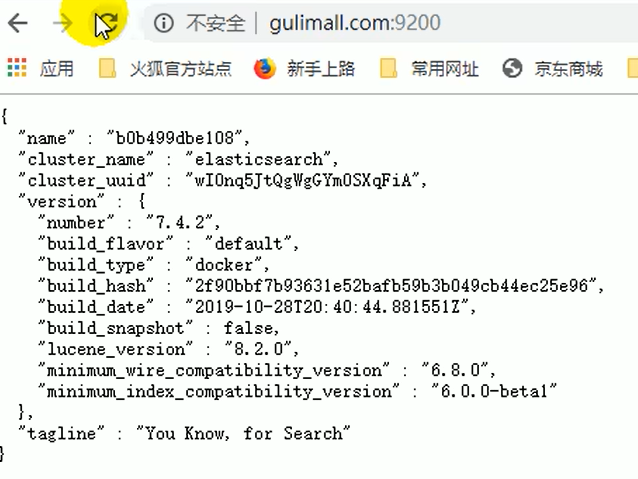
重启Nginx容器,访问“gulimall.com” :

访问接口:

4.3.7、小结,反向代理流程
- 客户端访问windows浏览器端
gulimall.com,浏览器会访问我们配置好的虚拟机 - 虚拟机中的nginx监听80端口(server_name也配置了gulimall.com),nginx.conf中
include /etc/nginx/conf.d/*.conf;配置代表包含conf.d下的所有.conf文件,用来配置server - gulimall.conf配置
proxy_pass http://gulimall;,代表访问这个地址会转交到nginx.conf的upstream gulimall下,这里配置的是网关的地址 - 在上述nginx将请求移交给网关的时候,nginx会丢失好些数据,例如host、cookie等等,而我们网关配置的断言又是根据host,
proxy_set_header Host $host;这个配置代表保留host信息 - gateway根据域名断言将请求转发给对应的服务
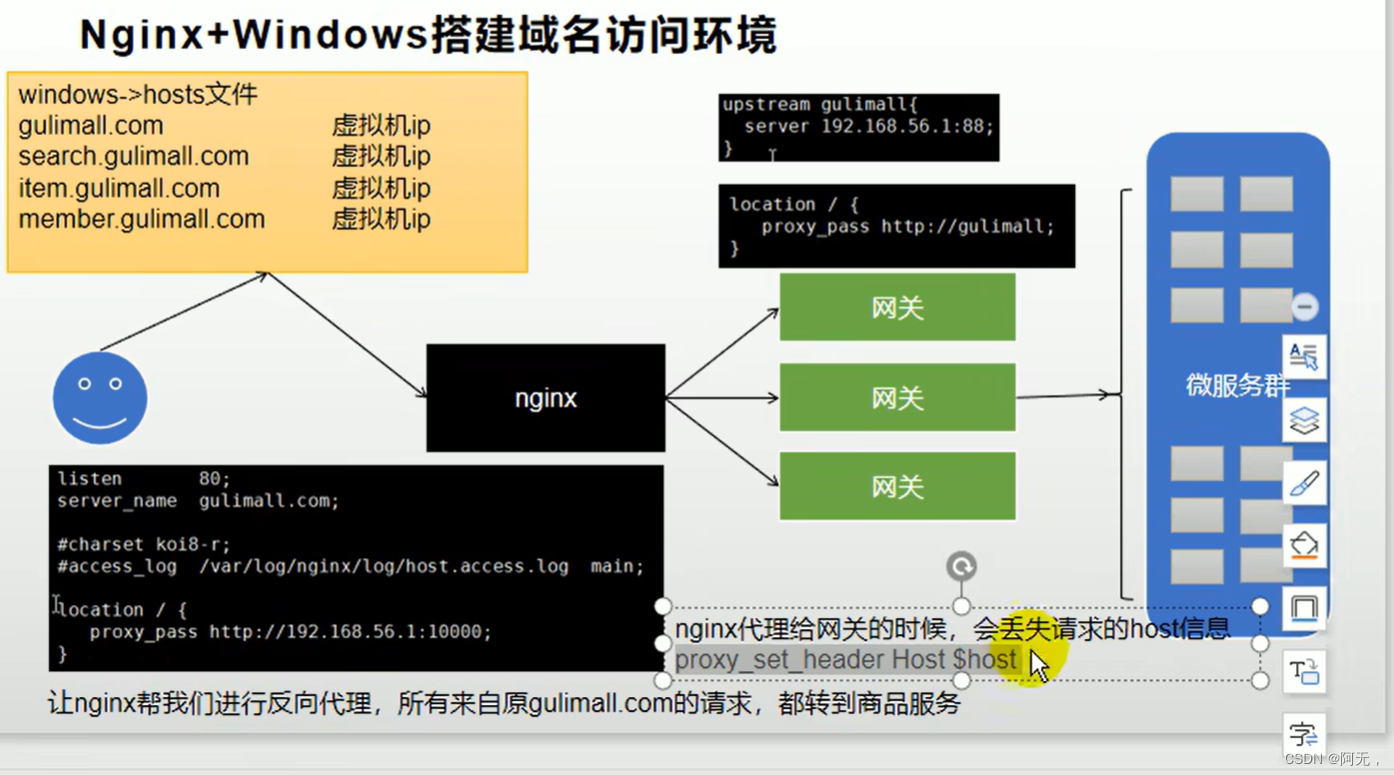
nginx代理给网关的时候,会丢失请求的Host信息,需要配置。


