2019独角兽企业重金招聘Python工程师标准>>> 
ssl 原理
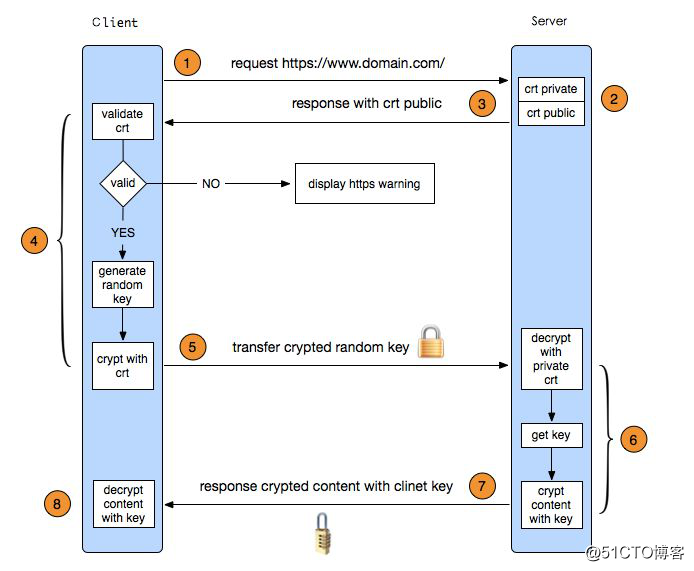
SSL工作流程
1.浏览器发送一个https的请求给服务器;
2.服务器要有一套数字证书,可以自己制作(后面的操作就是阿铭自己制作的证书),也可以向组织申请,区别就是自己颁发的证书需要客户端验证通过,才可以继续访问,而使用受信任的公司申请的证书则不会弹出>提示页面,这套证书其实就是一对公钥和私钥; 服务器会把公钥传输给客户端; 客户端(浏览器)收到公钥后,会验证其是否合法有效,无效会有警告提醒,有效则会生成一串随机数,并用收到的公钥加密; 客户端把加密后的随机字符串传输给服务器; 服务器收到加密随机字符串后,先用私钥解密(公钥加密,私钥解密),获取到这一串随机数后,再用这串随机字符串加密传输的数据(该加密为对称加密,所谓对称加密,就是将数据和私钥也就是这个随机字符串>通过某种算法混合在一起,这样除非知道私钥,否则无法获取数据内容); 服务器把加密后的数据传输给客户端; 客户端收到数据后,再用自己的私钥也就是那个随机字符串解密;
http和https区别: https通信是加密的。数据包在传输的时候可能被***抓包截取。如果是做https的话,抓取的包是加密的也不能解密
生成SSL密钥对
cd /usr/local/nginx/confopenssl genrsa -des3 -out tmp.key 2048//key文件为私钥openssl rsa -in tmp.key -out aminglinux.key //转换key,取消密码 rm -f tmp.keyopenssl req -new -key aminglinux.key -out aminglinux.csr//生成证书请求文件,需要拿这个文件和私钥一起生产公钥文件openssl x509 -req -days 365 -in aminglinux.csr -signkey aminglinux.key -out aminglinux.crt这里的aminglinux.crt为公钥1.首先需要安装一个工具 openssl ,rpm -qf which openssl
[root@xuexi-001 conf]# rpm -qf `which openssl`
openssl-1.0.2k-12.el7.x86_64
[root@xuexi-001 conf]# yum -y install openssl
2.openssl genrsa -des3 -out tmp.key 2048 //rsa形式的key文件为私钥
[root@xuexi-001 conf]# openssl genrsa -des3 -out tmp.key 2048
Generating RSA private key, 2048 bit long modulus
..............................................+++
....................................+++
e is 65537 (0x10001)
Enter pass phrase for tmp.key:111111
Verifying - Enter pass phrase for tmp.key:111111
3.openssl rsa -in tmp.key -out aminglinux.key //-in转换key,取消密码
-out输出的
[root@xuexi-001 conf]# openssl rsa -in tmp.key -out aminglinux.key
Enter pass phrase for tmp.key:111111
writing RSA key
4.rm -f tmp.key // aminglinux.key和tmp.key实际上是一个私钥,只不过tmp有密码,aming 没有密码,这时候可以删除tmp.key
[root@xuexi-001 conf]# rm -rf tmp.key
5.openssl req -new -key aminglinux.key -out aminglinux.csr //生成证书请求文件,需要拿这个文件和私钥一起生产公钥文件
[root@xuexi-001 conf]# openssl req -new -key aminglinux.key -out aminglinux.csr
You are about to be asked to enter information that will be incorporated
into your certificate request.
What you are about to enter is what is called a Distinguished Name or a DN.
There are quite a few fields but you can leave some blank
For some fields there will be a default value,
If you enter '.', the field will be left blank.
-----
Country Name (2 letter code) [XX]:china
string is too long, it needs to be less than  2 bytes long
Country Name (2 letter code) [XX]:11
State or Province Name (full name) []:Beijing
Locality Name (eg, city) [Default City]:Beijing
Organization Name (eg, company) [Default Company Ltd]:guo
Organizational Unit Name (eg, section) []:
Common Name (eg, your name or your server's hostname) []:
Email Address []:Please enter the following 'extra' attributes
to be sent with your certificate request
A challenge password []:123456
An optional company name []:guo
这里面的信息可以自己自定义,如果是正式购买的证书,需要填写真实的信息
6.openssl x509 -req -days 365 -in aminglinux.csr -signkey aminglinux.key -out aminglinux.crt 这里的aminglinux.crt为公钥
[root@xuexi-001 conf]# openssl x509 -req -days 365 -in aminglinux.csr -signkey aminglinux.key -out aminglinux.crt
Signature ok
subject=/C=11/ST=Beijing/L=Beijing/O=guo
Getting Private key
[root@xuexi-001 conf]# openssl x509 -req -days 365 -in aminglinux.csr -signkey aminglinux.key -out aminglinux.crt
Signature ok
subject=/C=11/ST=Beijing/L=Beijing/O=guo
Getting Private key
7.这时已经生成了公钥和私钥 ,就可以配置Nginx ssl
[root@xuexi-001 conf]# ls aminglinux.
aminglinux.crt  aminglinux.csr  aminglinux.key
Nginx配置ssl目录概要
vim /usr/local/nginx/conf/vhost/ssl.conf//加入如下内容
server
{listen 443;server_name aming.com;index index.html index.php;root /data/wwwroot/aming.com;ssl on;ssl_certificate aminglinux.crt;ssl_certificate_key aminglinux.key;ssl_protocols TLSv1 TLSv1.1 TLSv1.2;
}
-t && -s reload //若报错unknown directive “ssl” ,需要重新编译nginx,加上--with-http_ssl_module
mkdir /data/wwwroot/aming.com
echo “ssl test page.”>/data/wwwroot/aming.com/index.html
编辑hosts,增加127.0.0.1 aming.com
curl https://aming.com/
Nginx配置ssl
1.上一节已经配置好了公钥和私钥,接下来配置Nginx.生成新的配置文件 vi/usr/local/nginx/conf/vhost/ssl.conf
[root@xuexi-001 conf]# vim /usr/local/nginx/conf/vhost/ssl.confserver
{listen 443;    // 监听端口为443server_name aming.com;  //主机名index index.html index.php;root /data/wwwroot/aming.com;  //root 目录ssl on;    //开启sslssl_certificate aminglinux.crt; //指定公钥ssl_certificate_key aminglinux.key;//指定私钥ssl_protocols TLSv1 TLSv1.1 TLSv1.2;//ssl 的协议
}
ssl 的协议,一般情况下,三种协议都配置上
2.创建/data/wwwroot/aming.com目录
[root@xuexi-001 conf]# mkdir /data/wwwroot/aming.com
3.检测配置文件并重新加载文件
[root@xuexi-001 conf]# /usr/local/nginx/sbin/nginx -t
nginx: [emerg] unknown directive "ssl" in /usr/local/nginx/conf/vhost/ssl.conf:7
nginx: configuration file /usr/local/nginx/conf/nginx.conf test failed
报错:
因为不知道这个 ssl 配置,在编译nginx的时候,并没有指定支持ssl
[root@xuexi-001 conf]# /usr/local/nginx/sbin/nginx -V
nginx version: nginx/1.15.1
built by gcc 4.8.5 20150623 (Red Hat 4.8.5-28) (GCC)
configure arguments: --prefix=/usr/local/nginx
解决办法:
重新编译
4.重新编译Nginx
[root@xuexi-001 conf]# cd /usr/local/src/nginx-1.15.1
[root@xuexi-001 nginx-1.15.1]# ./configure --help |grep -i ssl--with-http_ssl_module             enable ngx_http_ssl_module--with-mail_ssl_module             enable ngx_mail_ssl_module--with-stream_ssl_module           enable ngx_stream_ssl_module--with-stream_ssl_preread_module   enable ngx_stream_ssl_preread_module--with-openssl=DIR                 set path to OpenSSL library sources--with-openssl-opt=OPTIONS         set additional build options for OpenSSL
编译的时候需要加上--with-http_ssl_module
5.初始化./configure --prefix=/usr/local/nginx --with-http_ssl_module
[root@xuexi-001 conf]# ./configure --prefix=/usr/local/nginx --with-http_ssl_module
[root@xuexi-001 conf]#  make
[root@xuexi-001 conf]#  make install
6.编译安装完成后 查看nginx的编译参数,会看到增加了 --with-http_ssl_module
[root@xuexi-001 nginx-1.15.1]# /usr/local/nginx/sbin/nginx -V
nginx version: nginx/1.15.1
built by gcc 4.8.5 20150623 (Red Hat 4.8.5-28) (GCC)
built with OpenSSL 1.0.2k-fips  26 Jan 2017
TLS SNI support enabled
configure arguments: --prefix=/usr/local/nginx --with-http_ssl_module
7.检测配置文件和重启nginx
[root@xuexi-001 nginx-1.15.1]# /usr/local/nginx/sbin/nginx -t/usr/local/nginx/conf/vhost/ssl.conf:7
nginx: the configuration file /usr/local/nginx/conf/nginx.conf syntax is ok
nginx: configuration file /usr/local/nginx/conf/nginx.conf test is successful
[root@xuexi-001 nginx-1.15.1]# /etc/init.d/nginx restart
Restarting nginx (via systemctl):                          [  确定  ]
- 查看监听端口,此时会发现多出一个443端口
[root@xuexi-001 nginx-1.15.1]#
netstat -lntp
Active Internet connections (only servers)
Proto Recv-Q Send-Q Local Address           Foreign Address         State       PID/Program name
tcp        0      0 127.0.0.1:25            0.0.0.0:*               LISTEN      1533/master
tcp        0      0 0.0.0.0:443             0.0.0.0:*               LISTEN      5716/nginx: master
tcp        0      0 0.0.0.0:80              0.0.0.0:*               LISTEN      5716/nginx: master
tcp        0      0 0.0.0.0:22              0.0.0.0:*               LISTEN      1205/sshd
tcp6       0      0 ::1:25                  :::*                    LISTEN      1533/master
tcp6       0      0 :::3306                 :::*                    LISTEN      1576/mysqld
tcp6       0      0 :::22                   :::*                    LISTEN      1205/sshd
php-fpm的pool
为了避免因多站点使用同一个pool时因一个站点故障导致pool出问题,进而影响使用同一个pool的其他站点的正常运行,要对每个站点配置一个单独的pool。
为php-fpm增加pool
1.编辑php-fpm配置文件:
[root@xuexi-001 ~]# vim /usr/local/php-fpm/etc/php-fpm.conf
[aming.com]
listen = /tmp/aming.sock
#listen = 127.0.0.1:9000
listen.mode = 666
user = php-fpm
group = php-fpm
pm = dynamic
pm.max_children = 50
pm.start_servers = 20
pm.min_spare_servers = 5
pm.max_spare_servers = 35
pm.max_requests = 500
rlimit_files = 1024
2.检测配置文件及重新加载
[root@xuexi-001 ~]# /usr/local/php-fpm/sbin/php-fpm -t
[13-Jul-2018 09:49:18] NOTICE: configuration file /usr/local/php-fpm/etc/php-fpm.conf test is successful[root@xuexi-001 ~]# /etc/init.d/php-fpm reload
Reload service php-fpm  done
3.查看进程
[root@xuexi-001 ~]# ps aux |grep php-fpm······
php-fpm: pool aming.com
php-fpm    1585  0.0  0.2 229336  4736 ?        S    09:49   0:00php-fpm: pool aming.com
php-fpm    1586  0.0  0.2 229336  4740 ?        S    09:49   0:00php-fpm: pool aming.com
4.为站点配置pool
[root@xuexi-001 ~]# cd /usr/local/nginx/conf/vhost/
[root@xuexi-001 vhost]# ls
aaa.com.conf  load.conf  proxy.conf  ssl.conf  test.com.conf
[root@xuexi-001 vhost]# vi aaa.com.conf
location ~ \.php${include fastcgi_params;fastcgi_pass unix:/tmp/aming.sock;fastcgi_index index.php;fastcgi_param SCRIPT_FILENAME /data/wwwroot/default$fastcgi_script_name;}
说明: 把fastcgi_pass地址改为和php-fpm.conf中一样的地址就可以。
添加php-fpm.conf子配置文件
为了便于管理,可以将php-fpm中的每个pool单独进行管理。进行如下操作,添加php-fpm子配置文件:
[root@xuexi-001 vhost]# vim /usr/local/php-fpm/etc/php-fpm.conf[global]
pid = /usr/local/php-fpm/var/run/php-fpm.pid
error_log = /usr/local/php-fpm/var/log/php-fpm.log
include = etc/php-fpm.d/*.conf
说明: 在全局变量版块添加参数“include = etc/php-fpm.d/*.conf”。然后可以清除php-fpm配置文件中其他参数,再到php-fpm.d目录下进行单独设置。
1.创建指定目录
[root@xuexi-001 vhost]# cd /usr/local/php-fpm/etc/
[root@xuexi-001 etc]# mkdir php-fpm.d
[root@xuexi-001 etc]# cd php-fpm.d/
[root@xuexi-001 php-fpm.d]#
2.创建php-fpm子配置文件:
[root@xuexi-001 php-fpm.d]# vim www.conf[www]
listen = /tmp/php-fcgi.sock
listen.mode = 666
user = php-fpm
group = php-fpm
pm = dynamic
pm.max_children = 50
pm.start_servers = 20
pm.min_spare_servers = 5
pm.max_spare_servers = 35
pm.max_requests = 500
rlimit_files = 1024[root@xuexi-001 php-fpm.d]# vim 1111.cof[1111.com]
listen = /tmp/1111.sock
listen.mode = 666
user = php-fpm
group = php-fpm
pm = dynamic
pm.max_children = 50
pm.start_servers = 20
pm.min_spare_servers = 5
pm.max_spare_servers = 35
pm.max_requests = 500
rlimit_files = 1024
3.检测语法错误并重新加载
[root@xuexi-001 php-fpm.d]# /usr/local/php-fpm/sbin/php-fpm -t
[13-Jul-2018 10:38:07] NOTICE: configuration file /usr/local/php-fpm/etc/php-fpm.conf test is successful[root@xuexi-001 php-fpm.d]# /etc/init.d/php-fpm reload
Reload service php-fpm  done
配置完成后使用ps查看php-fpm进程信息。
12.22 php-fpm的慢执行日志
开启慢执行日志:
1.加入以下内容
request_slowlog_timeout = 1
//当请求超过1秒开始记录日志
slowlog = /usr/local/php-fpm/var/log/www-slow.log
//日志存放地址
[root@xuexi-001 php-fpm.d]# vim /usr/local/php-fpm/etc/php-fpm.d/www.conf[www]
listen = /tmp/php-fcgi.sock
listen.mode = 666
user = php-fpm
group = php-fpm
pm = dynamic
pm.max_children = 50
pm.start_servers = 20
pm.min_spare_servers = 5
pm.max_spare_servers = 35
pm.max_requests = 500
rlimit_files = 1024
request_slowlog_timeout = 1
slowlog = /usr/local/php-fpm/var/log/www-slow.log
2.检测语法错误并重新加载
[root@xuexi-001 php-fpm.d]# /usr/local/php-fpm/sbin/php-fpm -t
[13-Jul-2018 10:58:15] NOTICE: configuration file /usr/local/php-fpm/etc/php-fpm.conf test is successful[root@xuexi-001 php-fpm.d]#  /etc/init.d/php-fpm reload
Reload service php-fpm  done
试验:
在使用www pool的站点添加文件:
创建一个.php文件:
[root@xuexi-001 php-fpm.d]# vim /data/wwwroot/test.com/sleep.php<?php
echo "test slow log";
sleep(2);
echo "done";
?>
检测
[root@xuexi-001 php-fpm.d]# curl -x127.0.0.1:80 test.com/sleep.php
test slow logdone
查看慢日志:
[root@xuexi-001 php-fpm.d]# tail /usr/local/php-fow.log log/www-sl [13-Jul-2018 11:00:43]  [pool www] pid 2058
script_filename = /data/wwwroot/test.com/sleep.php
[0x00007fdc23027280] sleep() /data/wwwroot/test.com/sleep.php:3
12.23 php-fpm中指定open_basedir
当一台服务器跑多个站点时,使用open_basedir限定各个站点所能访问的服务器上的目录的范围。在php-fpm服务中,可以针对每个pool设定open _ basedir。
1.核心配置参数:
增加一行内容 php_admin_value[open_basedir]=/data/wwwroot/test.com:/tmp/
[root@xuexi-001 php-fpm.d]# vim /usr/local/php-fpm/etc/php-fpm.d/www.conf  [www]
listen = /tmp/php-fcgi.sock
listen.mode = 666
user = php-fpm
group = php-fpm
pm = dynamic
pm.max_children = 50
pm.start_servers = 20
pm.min_spare_servers = 5
pm.max_spare_servers = 35
pm.max_requests = 500
rlimit_files = 1024
request_slowlog_timeout = 1
slowlog = /usr/local/php-fpm/var/log/www-slow.log
php_admin_value[open_basedir]=/data/wwwroot/test.com:/tmp/
2.创建测试PHP脚本:
[root@xuexi-001 php-fpm.d]# vim /data/wwwroot/test.com/1.php<?php
echo "This is a test php of open_basedir";
3.测试
[root@xuexi-001 php-fpm.d]# curl -x127.0.0.1:80 test.com/1.php
This is a test php of open_basedir
12.24 php-fpm进程管理
php-fpm中pool配置参数解析:
[www]
listen = /tmp/php-fcgi.sock
listen.mode = 666
user = php-fpm
group = php-fpm
pm = dynamic
;定义进程启动方式(dynamic表示动态,static表示静态)
;只有此处设置为dynamic,下面的配置才生效
pm.max_children = 50
;最多可启动的子进程数量
pm.start_servers = 20
;设定初始启动的进程数量
pm.min_spare_servers = 5
;表示php-fpm空闲时最少要有几个子进程
pm.max_spare_servers = 35
;表示php-fpm空闲时最多要有几个子进程
pm.max_requests = 500
;表示一个子进程最多可接受多少个请求
rlimit_files = 1024
;表示每个子进程打开的多少个文件句柄
request_slowlog_timeout = 1
;当请求超过1秒开始记录日志
slowlog = /usr/local/php-fpm/var/log/www-slow.log
;日志存放地址
php_admin_value[open_basedir]=/data/wwwroot/test.com:/tmp/


